BLOGGER TEMPLATES AND TWITTER BACKGROUNDS
Showing posts with label News. Show all posts

Saturday, April 30, 2011

New Award!

I just discovered a won an award at My Tag Art (TART) licensing company, which you can read about here. I am so excited - been a long time since I've won an award for something I've done!!

So here it is the award - check it out!!

Monday, January 31, 2011

Touching Base

I know, I've been away for a while - just been so busy, and kinda hit a 'slump' in regards to tutorial writing, however I'm planning on getting back to it, now that it's the start of the new year. Hang in there with me - good things are ahead!

Sunday, July 18, 2010

Come Sail Away!!

Sharing some tags I made with an absolutely ADORABLE kit from Designs by Tishia! The kit is called "Sail Away" (I used the tagger size kit - it is also available in full size) and can be found HERE in the Scrappin Bratz store. I had a lot of fun with this kit and look forward to using it again!

Here are the tags I made for Tishia:

Photobucket

Photobucket

Thanks to Tishia for allowing me to use her wonderful, creative kit!!

If you like what you see, head on over to the store and grab it. Tishia also has a lot of other wonderful creations to choose from.

Saturday, June 26, 2010

Swan's Flight

Just wanted to share 2 new tags with you that I made using the beautiful kit by Darkmoon's Dream called Swan's Flight :

Photobucket

Photobucket

If you like what you see, be sure to stop by the store Scrappin' Bratz and check it out!

Saturday, February 13, 2010

Rac Amor Tutorial

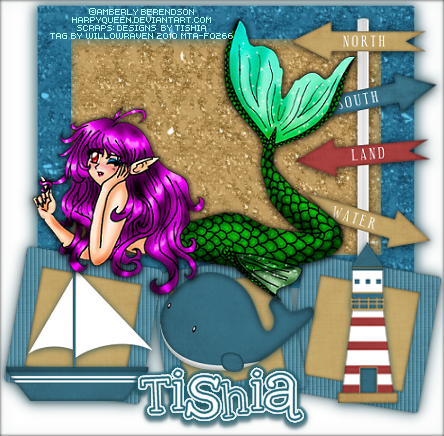
I have a new tutorial for you all!! This is the tag we will be making:

Moderate level - Some knowledge of PSP is needed.


Materials Needed

Paint Shop Pro (used Version 9, but can be done on any version) 

PTU kit called Mi Amor by BlackWidowCreations which can be bought at Scrappin' With Friends Tag Template #9 from Purple Dragonfly Creations 

Tube by Ismael Rac (Fantasy Girl) which is available through AMI, and must have a license to use  

Vix Mask Valentine 13 


Filters Needed: Eye Candy 5 Impact - Gradient Glow, Tramages - Tow the Line, Filters Unlimited 2 (Paper Textures and Buttons & Frames) 


Fonts used:  

Pixelette (for copyright info)

ObetteScriptSSK


DIRECTIONS


1. Open PSP

2. Copy Template then click on Shift + D to duplicate entire template. Close original template.

3. Open mask in PSP then minimize. We will be using it in a little bit. 

4. Open Paper20 and copy and paste on to your template. Make the circle background layer active. Go to Selections - Select All... Selections - Float then Selections - Defloat. Click on the paper layer, then go to Selections - Invert then click on your delete button. Go to Selections - Select None. 

5. Close out the Paper20 layer and make the circle background layer active again. Click on the outer black edge with your magic wand, then go to Adjust - Color Balance - Manual Color Correction and choose a color (dark) from the tube you are using. With the edge still selected, apply the following drop shadow:

Vertical: 0 

Horizontal: 0 

Opacity: 75 

Blur: 8.00 

color: Black 

Shadow on New Layer: unchecked 


Go to Selections - Select None. 


6. Go back to the Paper20 layer, make active, then right click on it and go to Properties. Choose Overlay, Opacity 80 (everything else leave it as it is), then click OK.

7. Go to Love WordArt layer, make active. Go to Adjust - Color Balance - Manual Color Correction and change the color from black to white. Click OK. 

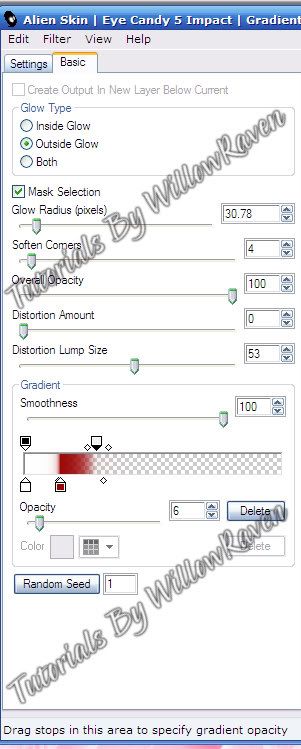
8. Close out all the layers except the 4 rectangle layers. Merge Visible. Keeping that layer active, go to Selections - Select All... Selections - Float then Selections - Defloat. Copy and paste Paper11 on to the template, then make that layer active, then go to Selections - Invert then click on your delete button. Go to Eye Candy 5 Impact, Gradient Glow and use the following settings (note, the color I used is the same color I used for the outer edge of the circle background, earlier):


Go to Selections - Select None, then apply the following drop shadow:

Vertical: 0 

Horizontal: 0 

Opacity: 60 

Blur: 15.00 

color: Black 

Shadow on New Layer: unchecked 


Delete the 4 rectangles layer, then unhide the largest heart layer. 


9. Click on the black egding of the largest heart layer and do to it what you did with the circle background, choosing a complementing color from your tube. Go to Selections - Select None. Using your magic wand, click on the inner part of the heart. Click delete (to remove the gray part of the heart). Go to Selections - Modify - Expand ... by 3 pixels, then click OK. Choose a paper (I am using Paper18) and copy and paste it on to the template. Go to Selections - Invert then click on your delete button. Move to just below your heart 'frame' that you have made. Keeping that background active and the marching ants on, copy and paste your tube to the template. Place it where you wish, then click delete (to remove the part of the tube outside of the area). Go to Selections - Select None to remove the marching ants. Apply your favorite drop shadow to the tube. Go back to the 'frame', apply the Tramages filter - Tow the Line with the default settings, then apply the following drop shadow settings:

Vertical: 0 

Horizontal: 0 

Opacity: 75 

Blur: 8.00 

color: Black 

Shadow on New Layer: unchecked 


With only those 3 layers open (all others hidden), go to Merge - Merge Visible. 


Do the same thing with the other 2 hearts, keeping in mind that you can slightly alter the color for the heart 'frame' area to give it a different look. Feel free to also use different papers for the background and to mess around with the settings in Tramages. 


Apply the following drop shadow on each finished heart:

Vertical: 0 

Horizontal: 0 

Opacity: 75 

 Blur: 15.00 c

olor: Black 

Shadow on New Layer: unchecked 


10. Move the hearts around so they are to your liking. I just moved them out a little to the outer edges. Then I used on of the close up images of the tube and copied and pasted it to the top of my template, then resized it by 85%. I moved her so that she was slightly off to the left. I applied the same drop shadow that I did to the smaller tube images. 


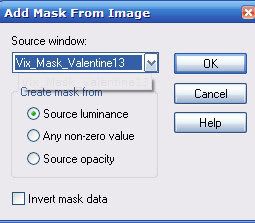
11. Clicking on the very bottom layer, copy and paste Paper23 on to the template. Bring to bottom, then apply the mask to that layer by going to Layers - New Mask Layer - From Image and use these settings: 

Merge group. Apply a slight drop shadow to the mask.

Go back to the very bottom layer and flood fill with a very pale color from your tube. Go back to mask layer, and merge down. Go to Filters Unlimited 2 and go to Paper Textures, Canvas-Coarse and use these settings:

Intensity: 29 

Lightness: 82 


Click Apply. Then go in to Filters Unlimited 2 again, and go to Buttons and Frames, Glass Frame 2 and use these settings:

Frame size: 15 

Contrast: 103 


Click Apply. 


12. Copy and paste Frame3 on to your template. Move it to under your 3 heart frames, then apply your favorite drop shadow. 13. Use additional elements to decorate your tag. 14. When you are happy with your tag, merge visible, then resize it to 500 pixels x 401 pixels (be sure all layers is checked). Sharpen if needed. 15. Be sure to include copyright information on your tag. 


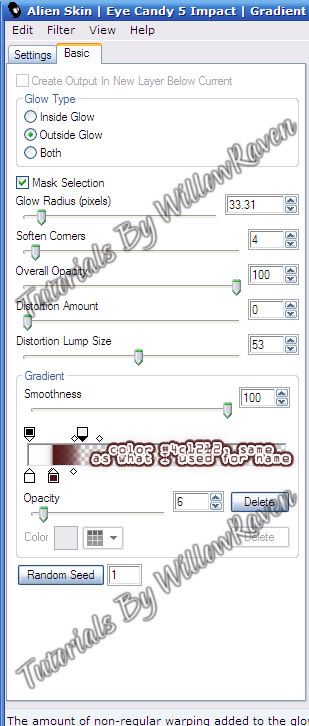
For the name, I used color #4c1212 for both foreground and background, width 2.0, size 48, then applied Gradient Glow settings:

and the following drop shadow: 


Vertical: 1 

Horizontal: 1 

Opacity: 65 

Blur: 4.00 

color: Black 

Shadow on New Layer: unchecked 


And you're all done! Would love to see what you come up with!!

Wednesday, December 23, 2009

Beauty of the Beach Tutorial

Beauty of the Beach Tutorial


This is what we will be making:


Photobucket


Moderate level - Some knowledge of PSP is needed.


Materials Needed


Paint Shop Pro (used Version 9, but can be done on any version)
PTU kit for Crazed's Creations called "Beauty of the Beach - Tagger" which can be bought at Scrappin' Bratz
Monti's Mask - blindsmask1

Filters Needed:
Blinds (comes with PSP)
Xero Porcelain - freeware
Eye Candy 5 Impact - Gradient Glow


Fonts used:
FFF Fuego (for copyright info)
Kamp Friendship (for name/text - paid font)


Directions


1. Open PSP. Open New File, 600 pixels x 600 pixels, 72 pixels/inch resolution, transparent. Open your mask, and minimize in PSP.

2. Copy and paste paper6, then resize it 75% (be sure "all layers" is UNchecked). Do the same thing for paper4. Rename the water layer "water", and rename the sand layer "sand".

3. Making the water layer active, go to Adjust - Blur - Gaussian Blur and apply the following settings: radius: 4.00 then click OK.

4. Making the sand layer active, then go to Layers - New Mask Layer - From Image and use the following settings:

Photobucket

Merge - Merge Group.


5. Copy and paste frame5 and center it over the mask area. Rename this layer "frame". Using the magic wand tool, click on the inside of the frame. Go to Selections - Modify - Expand and expand by 15 pixels. Click on OK. Choose a paper for the background to your frame (I chose paper16) then copy and paste it to your 'tag', then resize it 70% (be sure "all layers" is UNchecked). Go to Selections - Invert, then hit your Delete button. Move this layer to just under the frame layer and rename frame background. While you still have the marching ants on, copy and paste your tube and center it in the middle of the frame. Go to Selections - Modify - Contract and contract by 15 pixels. Click on the Delete button to remove all areas outside of the selected area. Go to Selections - Select None (to remove marching ants.) (If you have any stray areas outside of the selected area, just delete them with the eraser tool.) Rename this layer "tube" and move down to between the frame and frame background layers.


6. Go back to the frame background layer and make active. Go to Effects - Texture Effects - Blinds and use the following settings:

Photobucket

7. Go to frame layer and go to Selections - Select All, Selections - Float, Selections - Defloat. Apply the Porcelain effect with the following settings:

Photobucket

Apply Drop Shadow with the following settings:


Vertical: 0
Horizontal: 0
Opacity: 75
Blur: 18.00
Color: black
Shadow on new layer: unchecked


8. Go to tube layer and apply your preferred drop shadow settings.


9. Copy and paste on of the bows (I chose bow2). Move to top layer. Resize by 60% (be sure "all layers" is UNchecked). Move to the middle of the left side of frame (see my tag for idea). Duplicate, then mirror image. You should now have a ribbon on each side of the frame. Apply the following drop shadow to both bows:


Vertical: 0
Horizontal: 0
Opacity: 65
Blur: 10.00
Color: black
Shadow on new layer: unchecked

10. Copy and paste one of the starfish buttons (I chose button3). Resize by 80% (again, be sure "all layers" is UNchecked), and then move it over to the center part of the bow on the left side. When pleased, duplicate the button and mirror, so that you will now have one in the same area on the bow on the right side. Apply your favorite drop shadow settings to both buttons.

11. Use other elements (shells, starfish) to decorate as you desire.

12. Once you have it decorated as you desire, copy and paste one of the starfish tags (I chose starfishtag1), then resize it by 55% ("all layers" UNchecked), then place it on the left side of your tag, near the bow/button decoration. Duplicate the starfish tag, then move one of the copies to under your bow/button elements. Then, on the top one, you are going to take your eraser tool and erase the top part, like the area that is in the square:

Photobucket


You are going to want it to look like the string is coming from BEHIND the button, like this:

Photobucket


Add your preferred drop shadow to the bottom starfish tag.


13. When you have the tag looking how you want, resize it (all layers CHECKED), to 500 pixels x 500 pixels. Sharpen (Adjust - Sharpen) anything that might have become blurry in the resize.

14. Add your copyright information to your tag. Additionally, if you wish to crop any of the sides or top (if it seems to much to you), now is the time. (I cropped mine a little bit so the final tag ended up being 460 pixels x 489 pixels, and changed the properties on the copyright layer to "overlay".)

15. Merge All Visible and save as a .jpg

16. Add name, place in the starfish tag area. Go to Edit - Copy Merged and then save as jpg.


For text on tag, I used Kamp Friendship at size 14, 1.0 stroke, color #0d3044 for both foreground and background, rotated it 37 degrees to the left, then centered it in the starfish shape. Then I used Eye Candy 5 Impact - Gradient Glow with the following settings:

Photobucket


then applied the following drop shadow settings:


Vertical: 1
Horizontal: 1
Opacity: 65
Blur: 3.00
Color: black
Shadow on new layer: unchecked


And that is it!!

I hope you enjoyed the tutorial and would love to see your results!!


Wednesday, December 16, 2009

Penguin Parade Tutorial

TUTORIAL: Penguin Parade

This is what we will be making:

Photobucket


Moderate level - Some knowledge of PSP is needed.


Materials Needed

Paint Shop Pro (used Version 9, but can be done on any version)
Animation Shop 3.0
PTU kit by Tamsin McAtee Studios ("Penguin Christmas, Tagger") which can be bought at Katelynn's Designs
Poser from Batschis Poserdesign (sak6) , received through her group HERE
Zuzzanna Mask "Winter" (8th from top)
Filters Used: Eye Candy 5 Impact - Gradient Glow
Other Supplies Needed: Animation, found HERE
 
 
Fonts used: FFF Fuego (for copyright info)
ResPublica (for name/text)


DIRECTIONS


1. Open PSP. Open a New File - 600 pixels x 600 pixels, 72.000 pixels per inch (resolution), transparent.

2. Open mask, then minimize. Open Paper 4, copy and paste as new layer on to your new file. Go to Layers - New Mask Layer - From Image and use these settings:

Photobucket

Right click on that layer in the layer palette. Merge - Merge Group. Rename this layer "mask". Close original paper.

3. Open frame 2. Copy and paste as new layer. Image - Resize - 75%, all layers UNchecked. Center the frame over the 'frame' part of the mask, as shown here:

Photobucket

Rename this layer "frame". Close original frame. With the frame layer still active, go to Effects - Eye Candy 5 Impact, Gradient Glow and use the following settings:

Photobucket

Apply the following drop shadow settings:

Vertical: 2
Horizontal: 1
Opacity: 75
Blur: 18.00
Color: black
Shadow on new layer: unchecked


4. Open Paper 3. Copy and paste as new image. Image - Resize - 600 pixels x 600 pixels, all layers checked. Copy and paste the resized paper to your tag. Right click on that layer
in the layer palette and bring layer to bottom (Arrange - Send to Bottom). Rename this "background". If you find you now have a spare (empty/blank) layer, feel free to delete it. Close original paper.

5. Go to Mask layer, right click on it, go to Properties, and use the following settings:

Photobucket

6. Open tube, then copy and paste as new layer on to your tag. Resize as needed. (Make sure "all layers" is UNchecked.) Right click on the layer, go to Arrange - Bring to Top. Move tube towards right side of red frame area (see my tag for idea). Rename layer "tube". Apply the drop shadow settings used earlier.

7. Open the igloo element. Copy and paste as new layer. Image - Resize - 45% - all layers UNchecked. Move to the lower left side of frame (see my finished tag for idea). Rename "igloo". Move this layer to just under the "tube" layer. Apply the same drop shadow settings on the igloo that you did on your tube. Close original igloo file.

8. Open one of the penguin elements (I chose the one with the green hat). Copy, paste as new layer. Image - Resize - 35% - all layers UNchecked. Move to in front of the igloo. Apply same drop shadow settings. Rename this "penguin1". Open another of the penguin elements and do the same thing, except move it to the lower right side of the tube. Rename this "penguin2". Close original penguin files.

9. Open Tree 1 element. Copy and paste as new layer. Move to under the 2 penguin layers. Apply previous drop shadow settings. Rename this layer "tree". Move the tree to the right of the tube. Close original element file.

10. Open flower 1 and flower 2 (elements). Copy one of them, then paste as new layer. Image - Resize - 85% - all layers UNchecked. Move it to the upper left corner of the frame. Apply the following drop shadow settings:

Vertical: 1
Horizontal: 0
Opacity: 75
Blur: 7.00
Color: black
Shadow on new layer: unchecked

Copy the other flower, then paste as new layer. Image - Resize - 60% - all layers UNchecked. Place over the other flower, but off to the side (see my tag for idea). Apply the drop shadow you did for other flower element. Rename the layers as "flower1" and "flower2", respectively. Close original element files.

Save your file as a .pspimage file. (You aren't done yet - this is just to save all that you have done so far, just in case!)

11. Open Animation Shop, then open the animation from the zip file in Animation Shop. Go to Edit - Select All. Edit - Copy. Then go BACK to Paint Shop Pro and go to Edit - Paste Animation as Multiple Images (see screenshot):

Photobucket

Each frame of the animation will now be open in PSP as an individual frame. The last frame in the animation (frame 10) will be on top so that frame 1 be at the bottom.

12. Go to Layers - New Raster Layer. On the new layer, take your selection tool, be sure it set on rectangle. With the tool, make a rectangle inside of the frame area. Close out ALL layers except the frame layer. Making sure you have the new raster layer active, go to Selections - Modify - Expand by 2. Click ok. Move the new raster layer just under the frame layer. This is where you are going to need to pay close attention to what you are doing.

13. Go to your materials palette. Click on the Pattern tab. Click on the little arrow next to the preview window to open up the thumbnails. You are going to want the image that corresponds to the "frame 10" of your animation (for me, it would be "image 18"). Click on it. Keep Angle at 0, Scale at 100. Click ok. Go to floodfill tool and floodfill the inside of your rectangle with the "pattern" (your snow). Rename this "snow 10". Close out this layer. Go to Layers - New Raster Layer. Move it to just above the "snow10" layer. Go back to your materials palette and click the image prior to the one you just did (for me it would be "image 17"). Flood fill the inside of your rectangle with this pattern, rename the layer "snow 9" then close out the layer. Do this for each frame of the animation so that you will end up having 10 "snow" layers (with the layers renamed "snow" 1-10). Go to Selections - Select None to get rid of the marching ants from your rectangle.

Your layer palette should look something like this:

Photobucket

14. Open all the layers up EXCEPT the snow layers 2 through 10 (keep them closed for now). At this point, if you want to add any additional elements to your tag, feel free to do so.

15. When done, go to Resize - 500 pixels x 500 pixels - all layers CHECKED. Feel free to sharpen each layer, if needed.

16. When done, add copyright/crediting information.

17. Now... we are going to make our file for our animation. Pay attention to detail, take your time. All your layers should be open EXCEPT snow 2-10 layers. With the snow 1 layer open, go to Edit - Copy Merged, Edit - Paste as New Image. Then go back to our "template" and close the snow 1 layer, and open the snow 2 layer. Go to Edit - Copy Merged. Then go to the new image and click on Edit - Paste as new Layer. Go back to the 'template' and close snow 2, and open snow 3. Go to Edit - Copy Merged. Then go to the new image and click on Edit - Paste as new Layer. Do this for each snow layer. When you are done you should have 10 layers (1 with each snow layer on it). Save as .psp (Animation Shop) file (will be at the very top of the drop down menu when you click on Save As).

Photobucket

Go back to Animation Shop. Go to File - Animation Wizard - use following settings:

window 1: Same size as the first image frame (next)
window 2: transparent (next)
window 3: upper left corner of the frame, with the canvas color (next)
window 4: Yes, repeat the animation indefinetely, with a setting on 10 (next)
window 5: click on "add image" then browse to where you saved the .psp file, click on it, then click the "open" button - you will see the file show up on the list. Click "next", then "finish". The animation will now open up in Animation Shop. To preview it, go to View - Animation. If you need to fiddle with the speed of the animation (for the falling snow), this is the time to do it. Once you are satisfied, save it as a .gif.

18. Go to Paint Shop Pro. Add text (name) to template. Add any effects, as desired. (I am using Gradient Glow with previously used settings). Once I have the text looking like I want, I go to Edit - Copy (*not* Copy Merged)..... then go back to Animation Shop and go to Edit - Paste - Paste as new animation (or, Control + V, if using a shortcut). Now, because I have 10 frames to my tag, I will need 10 frames of my name. So I will click on Control + L 9 more times to apply what I just had copied as a new frame AFTER my current frame. You should now have a total of 10 frames of the name (text).

19. Go to your tag animation, Go to Edit - Select All .... Edit - Copy.... Edit - Paste - Paste as New Animation. Minimize the original tag.

20. Click on the name file, then go to Edit - Select All.... Edit - Copy. Click on the tag then go to Edit - Select All.... Edit - Paste Into Selected Frame then position the text where you want it. You will see the name show up in the same location on each frame. If you are happy with it, save the tag as a .gif and you are done!!


I would love to see your results, as I am sure the scrap designer and artist would too!


Thanks for checking out my tutorial and be sure to check back often for more!!

Thursday, November 19, 2009

End of Autumn Fairy Tutorial

TUTORIAL: End of Autumn Fairy

This is the tag we will be making:

Photobucket

This tutorial is written by me. Any similarities to any other tutorial is totally coincidental!

Beginner to Moderate level
Some knowledge of PSP is needed

Materials Needed

Paint Shop Pro (used Version 9, but can be done on any version) -- provide link
PTU kit for Sizzel's Designs ("End of Autumn - Tagger Size") which can be bought at Katelynn's Designs -
Tube: "Gold Butterfly Fairy" by Ronne Barton (used with MPT license, which can be purchased HERE)
Tag Template #78 from Simply Devilish Scrapz
Chelle's Mask #59

Filters Needed:
Weave (comes with PSP)
Blinds (comes with PSP)
Halftone (comes with PSP)
Xero Porcelain - Freeware
Eye Candy 4000, Gradient Glow

Fonts used:
FFF Fuego (for copyright info)
Black Rose(for name/text)


Directions

1. Open PSP, then open Tag Template. Shift + D to make copy of template, then close original. Then, on the copy we have open, either delete or close off the top layer that has the designers info on it.

2. From your tube, pick a dark color for your foreground and a lightish color (or contrasting color) for the background.

3. Go to "Multi Rectangle" layer, make active. Go to Selections - Select All.... Selections - Float .... Selections - Defloat. You should have marching ants around the rectangles. Take Paper2 from the kit and copy & paste as new layer, putting it above the "Multiple Rectangle" layer. Rename "Rectangles". Go to Selections - Invert. Click on the Delete Button.

4. Keeping marching ants around your rectangles, go to Selections - Invert then go to Effects - Texture Effects - Weave and use the following settings:

Photobucket

With the marching ants still around your rectangles, apply the following drop shadow (remember these settings as we will be using them throughout the tutorial for the drop shadow):

Vertical: 2
Horizontal: 1
Opacity: 40
Blur: 15.00
Color: Black
Shadow on New Layer: Unchecked

Go to Selections - Select None (to get rid of the marching ants).

5. Go to "Rectangle 1" layer, make active. Go to Selections - Select All.... Selections - Float .... Selections - Defloat. Take Paper12 from the kit and copy & paste as new layer, putting it above the "Rectangle 1" layer. Rename "Frame". Go to Selections - Invert. Click on the Delete Button. Go to Selections - Invert, then go to Effects - Textures - Blinds and use the following settings:

Photobucket

Apply previous drop shadow. Go to Selections - Select None (to get rid of the marching ants). Close out "rectangle1" layer.

6. Go to "Rectangle 2" layer, make active. Go to Selections - Select All.... Selections - Float .... Selections - Defloat. Take Paper8 from the kit and copy & paste as new layer, putting it above the "Rectangle 2" layer. Rename "Pic Background". Go to Selections - Invert. Click on the Delete Button. Go to Selections - Select None. Close out "rectangle2" layer.

7. Copy your tube, paste as new layer right about the "pic background" layer. Resize it by 115% (be sure "Resize All Layers" is UNchecked). Center your enlarged image the best you can over the "pic background" layer. Rename this "enlarged tube". When you are pleased with your centering, go back to "pic background" layer, make active, then go to Selections - Select All.... Selections - Float .... Selections - Defloat. Then click back onto the enlarged tube layer, then go to Selections - Invert, then click on the Delete button. Then, with the marching ants still there, go to Selections - Invert, then go to Adjust - Blur - Gaussian Blur ... Radius: 10.00 and click OK. Right click on the "enlarged tube" layer in the Layer palette, go to Properties and use the following settings:

Photobucket

Apply the previous drop shadow settings, then go to Selections - Select None.
Apply the previous drop shadow settings on the "pic background" layer as well.

8. Take your tube, copy and paste as new layer on to your template, then move to top. Rename "tube" layer. Center over the "pic background" layer, resize as needed (I resized 90%, be sure "resize all layers" is UNchecked). Apply Xero Porcelain with the following settings:

Photobucket

Apply drop shadow with these settings:

Vertical: 1
Horizontal: 0
Opacity: 50
Blur: 18.00
Color: black
Shadow on New Layer: UNchecked

9. Go to "Word Art" layer, make active. Go to Selections - Select All.... Selections - Float .... Selections - Defloat. Go to Layers - New Raster Layer. Flood fill the letters with one of the colors you choose (either foreground or background - I am using color #3d2826.) Close out the "wordart" layer. With the New layer with the wordart active, go to Effects - Artistic Effects - Halftone and use the following settings:

Photobucket

Go to Selections - Select None.

Apply Eye Candy 4000 - Gradient Glow with the following settings:

Glow Width: 4.00
Soft Corners: 25
Overall Opacity: 100

and here is how you will set the colors on the "color" tab:

Photobucket

Apply drop shadow with the following settings:

Vertical: 1
Horizontal: 0
Opacity: 100
Blur: 3.00
Color: black
Shadow on New Layer: UNchecked

10. Click on the "Backing" layer, make it active, then copy and paste Paper6 just above that layer. Rename "mask layer". Open mask in PSP, then minimize. Go to Layers - New Mask Layer - From Image and use these settings:

Photobucket

Go to your layer palette, right click on the "mask layer" layer, then go to Merge - Merge Group.

Apply following drop shadow to the masked layer:

Vertical: 1
Horizontal: 0
Opacity: 50
Blur: 3.00
Color: black
Shadow on New Layer: UNchecked

11. Copy Doodle 1 from Kit, paste to just under the tube layer. Place as you like, then apply the first drop shadow settings. Copy the original doodle 1 again, paste as new layer on the template. Rotate 25 degrees to the right (be sure "all layers" is unchecked). Move it around so it is under the rectangles and word art (see my tag for idea). Use the following drop shadow settings:

Vertical: 1
Horizontal: 0
Opacity: 50
Blur: 18.00
Color: black
Shadow on New Layer: UNchecked


12. Copy "jar" element, paste as new layer onto template, then move to top. Resize to 40%, then place as shown on the tutorial. Use following drop shadow settings:

Vertical: 1
Horizontal: 0
Opacity: 50
Blur: 3.00
Color: black
Shadow on New Layer: UNchecked

Continue to decorate the tag with butterflies, as desired.

13. Resize all layers to 500 pixels x 417 pixels. Sharpen any layers that are a bit blurry.

13. Apply copyright information, scrapper information, tagger information. When happy with tag, Merge Visible, save as .jpg.

14. Apply name using the foreground and background colors you chose at the beginning of the tutorial. On mine, after I applied the actual text, I then applied Eye Candy 4000 with the previous settings, and then modified the colors on the color tab to this:

first box: color #ebe2d6
second box: color #3d2826

and I just fiddled with the boxes til I got a look that I liked.

Then I applied the following drop shadow:


Vertical: 1
Horizontal: 0
Opacity: 85
Blur: 3.00
Color: black
Shadow on New Layer: UNchecked

Repeat drop shadow.


And we are done.

I would love to see your results!

Sunday, November 8, 2009

Mulberry Maiden Tutorial

TUTORIAL: Mulberry Maiden 
 
Photobucket 
 
Moderate level - Some knowledge of PSP is needed. 
 
Materials Needed
 Paint Shop Pro (used Version 9, but can be done on any version) 
PTU kit for Rieneke Designs ("Mulberry") which can be bought at Katelynn's Designs 
Posers from Sabine's Poser Park (portrait47 and woman107) 
 
Filters Needed:
 Xero Fritilliary (freeware)
 Eye Candy 5 - Impact Gradient Glow
 
 Fonts used:
 FFF Fuego (for copyright info)
 Avalanche Script TT (for name/text) 


DIRECTIONS
 
 
1. Open PSP 
 
2. Open New Image, 600x600 pixels, resolution 72.000 pixels/inch, transparent checked 
 
3. Open lace frame 3... copy & paste it as new layer. Resize it 75%, be sure "resize all layers" is UNchecked. Frame should be - for the most part - centered in your canvas. Move it SLIGHTLY to the left. Rename this layer "frame". 
 
 4. Click inside of the frame with your magic wand so you will see the marching ants. Go to Selections - Select All.... Selections - Float .... Selections - Defloat, then Selections - Modify - Expand ... choose 10 pixels, then click OK. 
 
5. Open one of the papers in the kit (I chose paper5) and copy and paste as new layer. Move it to just under the frame layer. At this point, if the print of the paper seems too large for the tag, feel free to resize it. (I resized my paper by 85%.) Go to Selections - Invert. Click on the Delete Button. Do NOT get rid of the marching ants yet. Rename this layer "frame paper". 
 
6. Open the image you will be using for inside the frame. (I am using portrait47 for this part). Copy & paste it as new layer, then move just under the frame but above the paper layer. Resize so that it looks nice and fits well inside the frame area. (I needed to resize my poser by 65%.) Be sure "resize all layers" is UNchecked when resizing. When you are happy with how it looks inside the frame, click on the delete button. Go to Selections - Select None (to get rid of the marching ants). Add drop shadow to image using these settings: 
 
Photobucket 
 
 Rename this layer "frame image". 
 
7. Go to your layer palette. Click on the locks for these 3 layers: frame, frame image, frame paper. Be sure they have the same number next to the locks, like this:
 
 Photobucket 
 
 This way, if you move one of those layers, it will stay together. 
 
8. Cllick on the 'frame paper' layer to make it active and change to opacity to 50. Then click on the 'frame image' layer to make it active. Right click on it in the layer palette, go to Properties and use the following settings: 
 
Photobucket 
 
9. Open on of the papers in the kit (choose one that doesn't have a lot of obvious design - I chose paper1.) Copy & paste as new layer, move to bottom. Resize by 75%, "resize all layers" UNchecked. Rename this "background paper". 
 
 10. Open mask in PSP then minimize. Go to Layers - New Mask Layer - From Image and use these settings: 
 
Photobucket 
 
Go to your layer palette, right click on the background paper layer, then go to Merge - Merge Group. You should now have something like this: 
 
Photobucket 
 
11. Copy your other tube (I am using woman107 here) and paste as new layer. Move to top. Resize as needed. After resizing, sharpen if needed (sometimes image will get slightly blurred if resized quite a bit.) Move the image towards the right side of frame (see completed tag for idea of what I mean.) Use drop shadow settings we used before, except change blur to 22.00. 
 
12. Choose a darker paper from kit (I chose paper10), copy and paste as new layer. Resize by 75%, "resize all layers" UNchecked. Rename this 'background'. Apply Xero Fritilliary filter with following settings: 
 
Granularity: 6 
Aggression: 30 
Tesselation: 48 
Variation: 40 
 
 
13. Open flowers1 from kit. Copy and paste as new layer. Move up to just above the frame layer. Resize by 50%, "resize all layers" UNchecked. Rename layer 'flowers 1". Move to the right of the frame, behind the girl on the chair (see finished tag for comparison.) Add drop shadow from before, with blur set at 15.00. 
 
14. Copy and paste heartstring element. Move to under the 'frame paper' layer. Go to Image - Mirror. Move it around so that the frame is in the center of this element. Use last used drop shadow settings. 
 
15. Open heart1 element. Copy and paste as new layer. Resize by 50%, "resize all layers" UNchecked. Rename 'heart'. Move to the top. Move heart around so that it is on the left area of frame. Duplicate heart (go to layer palette, right click on the heart layer, then go to Duplicate.) Resize by 50%, "resize all layers" UNchecked. This will already be named "Copy of heart". Go to Image - Mirror, then move it near the larger heart, slighly to the right. Use drop shadow, applying last used settings on both hearts. 
 
16. Make 'background" layer active. Go to Image - Resize and use the following settings - be sure that "resize all layers" is checked. Go to Filters Unlimited 2.0 - Paper Textures - Canvas, Fine with the following settings: 
 
Intensity: 110 
Lightness: 110 
 
 
17. While still on the background layer, go to the AAA Foto Frame Filter and use the following settings: 
 
Photobucket 
18. Add any other elements you would like at this point. 
 
19. Add copyright information, scrap designer information, tagger watermark. 
 
 20. Merge - Merge All Visible. Save as .jpg. For name/text 1. Using Avalance Script, size 62, stroke width 1.0 ...foreground #5e4133, background #dcbcc7, write your name and place it where you would like it. I am placing mine in the lower left side. When satisfied, convert to raster. Use Eye Candy 5 Impact Gradient Glow with the following settings: 
 
Photobucket 
 
Then apply a drop shadow with the following settings:
 
 Photobucket 
 
Then go to Edit - Repeat Drop Shadow. 
 
And you are done!! I would love to see your results!!!

Saturday, October 10, 2009

Creative Teams!!

I am just writing to let you all know that I have joined 2 new creative teams and I'm very excited about this! The first one is Katelynn's Designs Store, which can be found HERE. They have a lot of wonderful designers and beautiful kits so be sure to check them out!

The second one is a scrap designer who is selling some kits at Mistaken Art. Her name is Ruby who goes by the name Designs by Ruby, and she has some gorgeous, creative kits, and I'm really looking forward to creating with them!

I plan on working on some stuff over the weekend and into the week. Keep your eyes posted here for new stuff!!