Wednesday, August 1, 2012
CL Pink Yuki Tutorial
CL Plaid Yuki Tutorial
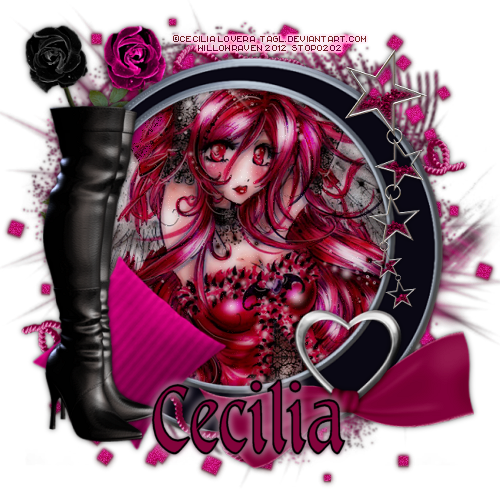
This is the tag we will be making:
Moderate level - Some knowledge of PSP is needed.
Materials Needed
Paint Shop Pro (used Version 9, but can be done on any version)
PTU kit "Plaid Princess - Tagger Size" by Sweet Southern Comfort Creations, found here
Tube is "Kit Jo Yuki" by Cecilia Lovera - you can get this beautiful tube at PSP Tube Shop, here
Mask of choice ... I used Trese Mask #0074, found here
Filters Needed
Tramages - Pool Shadow
Xero - Porcelain
Drop Shadow (found in the PSP program)
Fonts used
Rittswood Impresive (for copyright info)
Tarragon ICG (for name/text)
Please note that I will give the drop shadow settings that I have used HOWEVER feel free to use your own settings if you would like.
1. Open PSP. Open New File: 650 pixels x 650 pixels, 72.000 pixels/inch resolution, transparent. At this time, also open your mask and minimize in PSP.
2. Open roundframe6... copy & paste it as new layer. Resize 85%, be sure all layers is UNchecked. Copy and Paste Paper 1 (ppr_1) as a new layer, move just under the frame. In your layer palette, close out the paper layer and make the frame layer active and then, using your magic wand, click inside of the frame. Go to Selections - Modify - Expand ... by 8 pixels ... click OK. Go to Selections - Invert. In your layer palette, click on your paper layer and then click on your Delete button (you will see all the paper outside of the frame disappear so only the middle part remains).
3. Copy and Paste Paper 12 (ppr_12) as a new layer and then, in the layer palette, go to Arrange - Send to bottom. Go to Adjust - Blur - Motion Blur and use the following settings:
Angle: 120.00 Strength: 75%
Click OK, then go to Adjust - Blur - Motion Blur and use the following settings:
Angle: 303.00 Strength: 50%
Click OK.
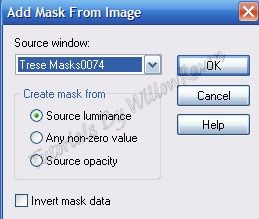
4. Go to Layers - New Mask Layer - From Image and use the following settings:
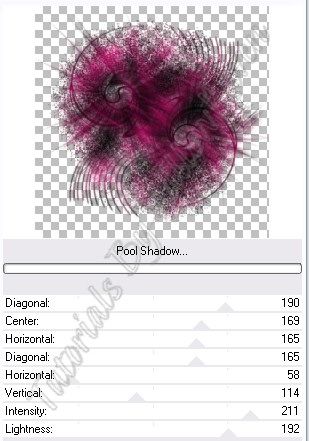
Merge - Merge Group then resize by 102%. Duplicate mask layer, move duplicate under the original mask layer. With the duplicate layer, go to Adjust - Blur - Gaussian Blur ... by 2 pixels - click OK. With the original mask layer, apply the Tramages - Pool Shadow filter with the following settings:
(I use mine through Filters Unlimited so my filter 'screen' may look different than yours. ...just apply the same settings and you should be fine.)
Duplicate mask layer, move duplicate under the original mask layer. With the duplicate layer, go to Adjust - Blur - Gaussian Blur ... by 2 pixels - click OK.
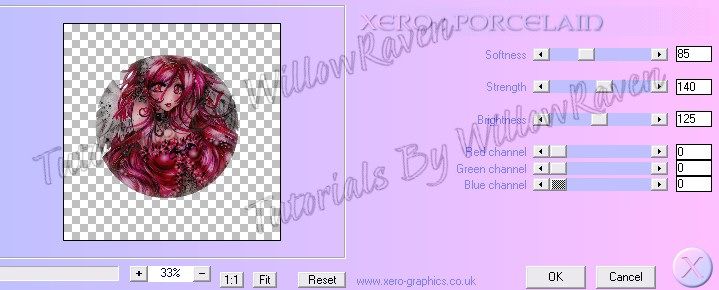
5. Activate your paper layer then go to Selections - Select All ... Selections - Float .... Selections - Defloat. You will see marching ants that are in the shape of the circle your paper is in. Copy and paste your tube/image so that it is the layer *just* above the paper layer (and below the frame layer) .... go to Selections - Modify - Expand .. by 5 pixels. Then go to Selections - Invert ... then, making sure your tube layer is active, click delete. Duplicate your tube layer. Bottom one, go to Adjust - Blur - Gaussian Blur ... by 3 pixels...click OK. Then on the top tube layer go to Xero - Porcelain and use the following settings:
Change to layer properties to Difference, opacity 100.
6. Copy and paste the Spiral Scatter, move to just above the top mask layer. Move it around so the upper right 'corner' is visible beyond the outer edge of the frame. Go to Adjust - Brightness and Contrast and apply the following settings:
Brightness: 10 Contrast: 15
Click OK.
Duplicate scatter layer, then go to Image - Flip ... and then Image - Rotate. Merge Down the top scatter layer to the bottom scatter layer (so the scatters are now on 1 layer). Duplicate the scatter layer. On top scatter layer, change properties to Screen, 95 opacity. On bottom scatter layer, go to Blur - Gaussian Blur - by 2 pixels.
7. At this point, continue to decorate the tag as desired with supplied elements. When you are satisfied, resize to 500 pixels x 500 pixels ... 72.000 ppi.... Weighted Average ... "all layers" CHECKED. Feel free to use the crop tool to crop out any additional edges from the tag. Use the Sharpen option (Adjust - Sharpness - Sharpen) if needed to clarify your layers.
8. Apply any desired drop shadows to the layers ... I used the following with the Drop Shadow filter that comes with PSP on all layers EXCEPT my tube layer, the paper background layer, the bottom scatter layer and the 2 mask layers:
Vertical and Horizontal: 0
Opacity: 60
Blur: 8.00
Color: black
Shadow on new layer: unchecked
On the top tube layer, I applied the following:
Vertical : 1
Horizontal: 0
Opacity: 50
Blur: 3.00
Color: #360208 (I chose a very dark color from my tube, but not black)
Shadow on new layer: unchecked
9. Apply drop shadow a second time to top tube layer. Do not apply any drop shadow to bottom tube layer. Do the same thing with the 2 scatter layers... apply the tube drop shadow settings to the top scatter layer (twice) except change the blur to 1.00 ... leave bottom scatter layer untouched.
10. Apply crediting information and watermark. When satisfied, merge visible. Apply name text and then you are done!
I would love to see what you come up with if you try my tutorial!!!
Posted by WillowRaven at 2:06 PM 0 comments
Labels: filters , No Template , PSP Tube Stop , PTU Artist , PTU kit
Subscribe to:
Comments
(
Atom
)

