Sunday, August 1, 2010
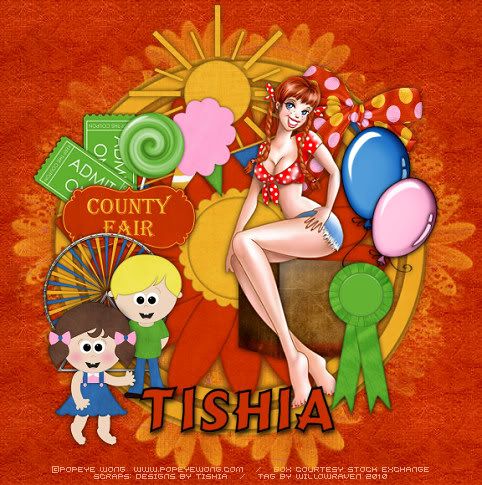
County Fair Tutorial
Moderate level - Some knowledge of PSP is needed.
PTU kit called County Fair by Designs by Tishia which can be bought at TKO Scraps
(*I used a full size kit - not available in tagger size - so the resizing will be a bit large*)
"Orange Juice" Tube by Popeye Wong which is Free To Use and can be found here (thanks Popeye!)
Box courtesy Free Images (formerly known as Stock Exchange) - General Permission Usage
You can download the box tube and the mask HERE
Filters Needed:
Blinds (comes with PSP)
Filters Unlimited 2 - Paper Textures
Fonts used:
FFF Fuego (for copyright info)
Cartoon Bold (for name/text)
DIRECTIONS
1. Open PSP. Also open your mask and minimize it in PSP.
2. Open Paper 5 and resize to 600 pixels x 600 pixels (resize all layers checked be sure to change the resolution from 300 ppi to 72 ppi). Go to Filters Unlimited 2 - Paper Textures - Fibrous Paper, Fine and use the following settings:
Intensity: 92
Lightness: 128
3. Open Paper 10 - copy and paste as new layer then resize it by 20% (be sure 'all layers' is UNchecked). Feel free to close out the original.
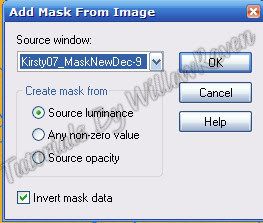
4. Go to Layers - New Mask Layer - From Image and use the following settings:
Right click on the layer in the layer palette, go to Merge - Merge Group. Rename this layer "Mask". Resize by 105% (be sure 'all layers' is UNchecked). Go to Effects - Texture Effects - Blinds and apply the following settings:
Width: 5
Opacity: 85
Color: #db9425
Horizontal: not checked
Light from left/top: not checked
Right click on the mask layer, go to Properties and apply the following settings:
Blend Mode: Screen
Opacity: 90
Link set: 0
Layer is visible: checked
Lock transparency: not checked
Highlight in layers palette: not checked
5. Copy and paste frame 1. Resize by 17% (be sure 'all layers' is UNchecked) and then resize it again by 80%. (Do not apply drop shadow to frame at this time - it can be applied later. Putting it on now will affect the look of step #5.).
6. Copy and paste flags, resize by 17% (be sure 'all layers' is UNchecked), then rotate going to Image - Rotate - Free Rotate with the following settings:
Direction: Left
Degrees: Free - 20.00
All Layers: not checked
Rotate Single Layer Around Canvas
Center: not checked
Position it like I have on my tag, then move to top and close out layer. Go back to the frame layer, make it active, then click on the OUTSIDE of the frame with your magic wand. You should now have marching ants. Go back to the flags layer, make it active and unhide it, then hit your delete button. Go to Selections - Select None. Copy and paste one of the flowers (I used flower 1) and resize it by 35% (be sure "resize all layers" is UNchecked), and then move it to just above the frame layer. Apply the following drop shadow:
Vertical: 0
Horizontal: 0
Opacity: 100
Blur: 10.00
Color: #513407 (*this is a darker shade of my frame - if you use the other frame, choose a very dark shade blue that complements the frame)
Shadow on New Layer: not checked
(I applied this drop shadow twice)
7. Copy and paste the box, resize it by 25% (be sure 'all layers' is UNchecked) and place it to the right, inside of the frame, but above the flag layer. Copy and paste your tube, resize it by 75% (be sure 'all layers' is UNchecked) and place her on the right so she is sitting on the box. Sharpen, if needed. Feel free to apply your favorite drop shadow to the flags, box and tube.
8. At this point, apply the following drop shadow to the frame:
Vertical: 0
Horizontal: 0
Opacity: 90
Blur: 10.00
Color: #5e1504 *this is a darker shade of my flower - if you use a different flower, choose a very dark shade of the flower petals
Shadow on New Layer: not checked
And then apply the drop shadow AGAIN (so you will be using the drop shadow twice on the flower).
9. Copy and Paste the sun, resize by 8% (be sure 'resize all layers' is UNchecked). Move to upper left side of area, inside frame (see my tag for idea). Move it just under the flag layer then apply your favorite drop shadow.
10. Take one of the bows (I used bow 1) and copy and paste as new layer, resize by 10% (be sure 'resize all layers' is UNchecked), and move it to the top right area of flags, behind her head, moving the layer just above the flags layer. Again, feel free to apply your favorite drop shadow on this. Do the same thing for the Carnival Fair sign (I resized by 8%) and place it like I have on my tag.
11. Copy and paste the single green "admit one" ticket, resize by 5% (be sure 'resize all layers' is UNchecked), duplicate, and then rotate (Image - Rotate - Free Rotate) the bottom one with the following settings:
Direction: Right
Degrees: 90.00
All Layers: not checked
Rotate Single Layer Around Canvas Center: not checked
And then rotate the other ticket with the following settings:
Direction: Right
Degrees:
Free - 35.00
All Layers: not checked
Rotate Single Layer Around Canvas
Center: not checked
Apply favorite drop shadow then click on the top ticket in the layer palette. Right click on it then go to Merge - Merge Down, then apply a slight drop shadow on the merged tickets. Move it to just under the Carnival Fair sign (see my tag for idea).
12. Copy and paste one of the lollipops (I used the green one), resize by 10% (all layers UNchecked). Then rotate using these settings:
Direction: Right
Degrees: Free - 15.00
All Layers: not checked
Rotate Single Layer Around Canvas Center: not checked
Apply your favorite drop shadow then move under the Carnival sign with the tickets. Copy and paste the Cotton Candy, resize by 6% (all layers UNchecked) and then rotate it with the following settings:
Direction: Right
Degrees: Free - 25.00
All Layers: not checked
Rotate Single Layer Around Canvas Center: not checked
Apply your favorite drop shadow then move under the Carnival sign below the lollipop layer.
13. Copy and paste the Ferris Wheel, resize by 10% (all layers UNchecked) and then by 50%, and move it to the left side, just over the Carnival Fair sign layer. Copy and paste one of the boys (I used boy 2) and resize by 10% (all layers UNchecked), moving it to the left, just above the ferris wheel layer. Do the same thing with one of the girls (I used the brown haired girl). Apply your favorite drop shadow or use the one I've been using which are these settings:
Vertical: 0
Horizontal: 0
Opacity: 75
Blur: 12.00
Color: black
Shadow on New Layer: not checked
14. At this point, if you would like to add any additional elements, feel free to do so. When satisfied, Merge Visible, and resize it to 485 pixels x 485 pixels ("resize all layers" should be checked). Sharpen if needed.
15. Add your copyright information, scrapper's information, your watermark and anything else you need.
16. Add name, placing it in the center of the bottom area of the frame (see my tag for idea).
And you are done!!
I would love to see what you make if you try this tutorial!!
Thanks for looking!
Posted by WillowRaven at 1:17 AM 0 comments
Labels: CT , Designers , Designs by Tishia , FTU artist , PTU kit , tag made , tutorial
Subscribe to:
Comments
(
Atom
)


