BLOGGER TEMPLATES AND TWITTER BACKGROUNDS
Showing posts with label FTU filter. Show all posts

Saturday, May 11, 2013

SD Berrylicious Forum Tag Tutorial


SD Berrylicious Forum Tutorial

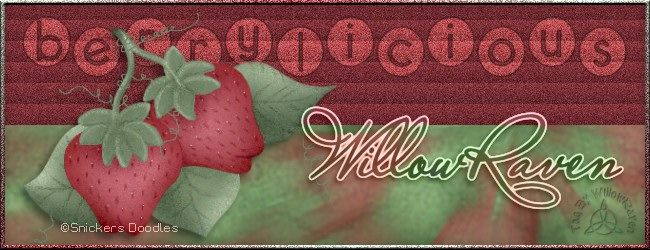
This is the tag we will be making:
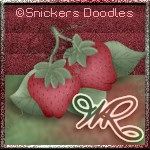
photo SDBerrylicious-avaWRbyWR_zpse35d5356.jpg
photo SDBerryliciousWRbyWR_zps0e6f1f34.jpg

Easy level - Basic knowledge of PSP is needed.

Materials Needed

Paint Shop Pro  (used Version 9, but can be done on any version)
Scraps -- None
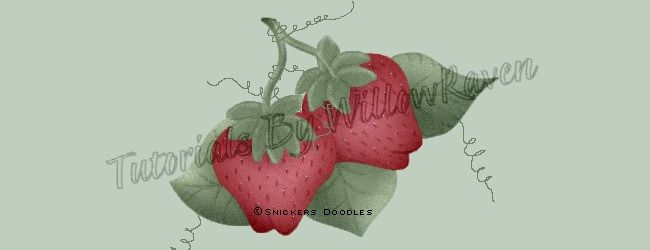
Tube of Choice - I am using a tube by FTU artist "Snickers Doodles" - tubes can be found in most © compliant tube share groups.
You could also use an element from a kit, or accent/embellishment - the sky is the limit!
"Berrylicious" Wordart made by me - can be downloaded HERE.

Filters Needed 

Reflections/Pattern - comes with PSP
Blinds - comes with PSP
Inner Bevel - comes with PSP
Drop Shadow - comes with PSP

Optional Filters (for Name/Text)
Eye Candy 4000 - HSB Noise
Eye Candy 5 Impact - Gradient Glow

Fonts used

Miss LeGatees (for name/text), 
Grixel Kyrou 9 Regular (for copyright info)

Please note that I typically add my drop shadows last.  I will give the drop shadow settings that I have used at the end of the tutorial HOWEVER feel free to use your own settings if/when you would like.

1.  Install the font(s).  (Alternative:  You can open and minimize the font; it should show in PSP.  I use a font program called Cfont Pro (http://www.veign.com/application.php?appid=101) - it temporarily installs the font and will uninstall it when you shut down your computer.)

2.  Open a new file, 650 pixels x 250 pixels, 72 ppi, transparent.  At this time, also Shift+D on your image (this will make a copy of your image) - then close out the original, then minimize it for the time being.

3.  Go to your materials palette and choose a medium-to-dark color from your tube for the foreground color and a medium-to-light color from your tube as your background color.  (I used #88343c for my foreground and #bfcebe for my background.... you could also go with complemetary or even contrasting colors of the tube colors, if you desire.)  Add new raster layer (Layer - New Raster Layer) and flood fill it with your background color, rename this "background color".  Go to your tube and copy and paste it as a new layer.  You should now have something like this:
photo SDStripes_SS1_zpsbfeda829.jpg

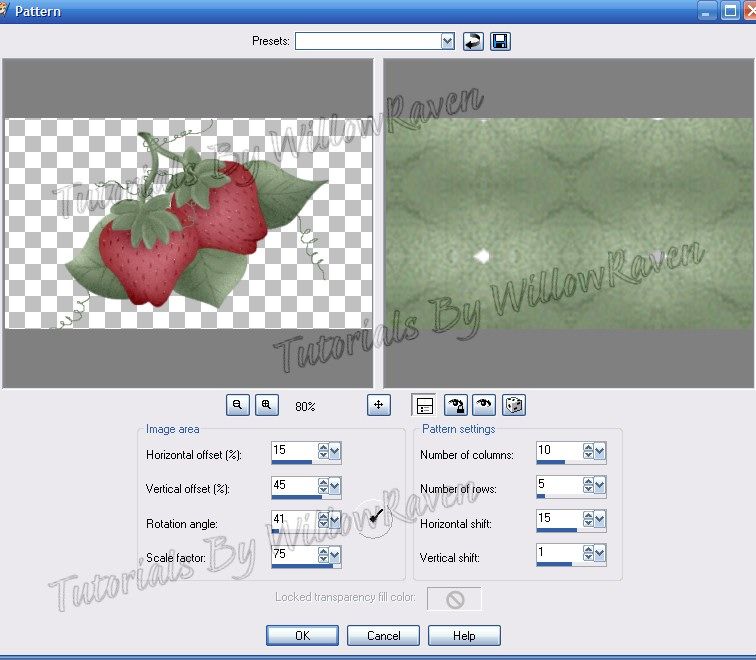
4.  Go to Effects - Reflection Effects - Pattern and apply the folowing settings:
photo SDStripes_SS2_zpsf36fb046.jpg
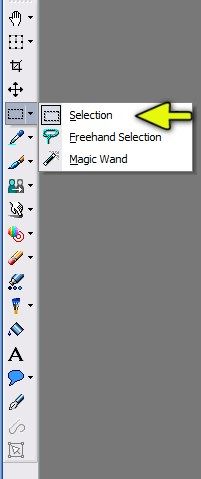
5.  Activate "Selection" in your "Selection Tool":
photo SDStripes_SS3_zpsce4ee8e2.jpg
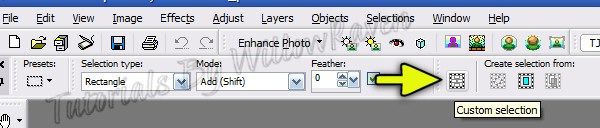
and then click on the "Custom Selection":
photo SDStripes_SS4_zps751d608e.jpg
and apply the following settings:
Top:  0    /    Left:  0     /  Right:  650     /    Bottom:  125
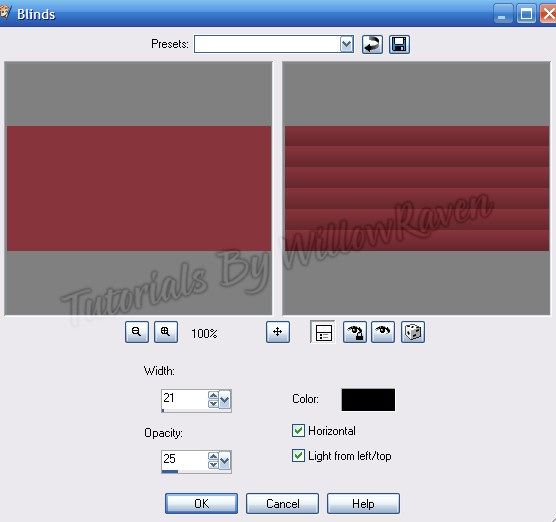
Add new raster layer (Layer - New Raster Layer) and flood fill it with your foreground color, and rename it "foreground color".   With the selection still activated (showing the 'marching ants'), go to Effects - Texture Effects - Blinds and apply the following settings:
photo SDStripes_SS5_zps06c51ef4.jpg
While still active, Adjust - Add/Remove Noise - Add Noise and use the following settings:  
Gaussian, 15, Monochrome checked
You may then de-select your layer (Selections - Select None).
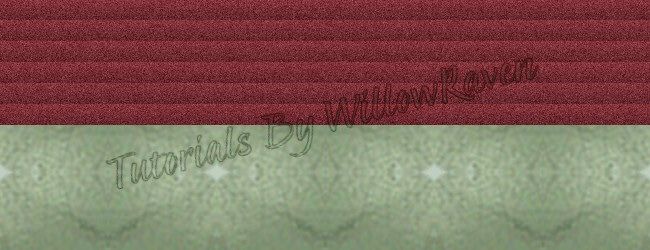
You should now have something like this:
photo SDStripes_SS6_zpsc3c80c9c.jpg

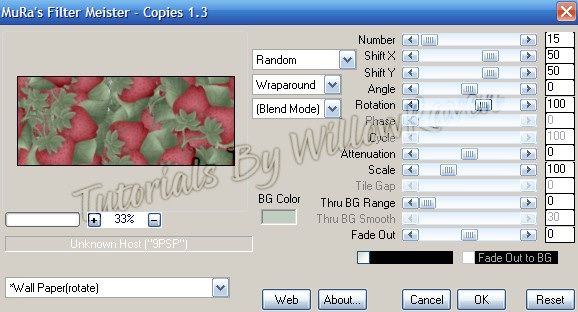
6.  Go to your tube and copy and paste as new layer to your tag (file).  Using Mura's Meister-Copies filter, apply these settings:
photo SDStripes_SS7_zps807b4a8b.jpg
Rename it "Copies", then move this layer below your background color layer, and change the layer properties to Multiply, Opacity: 85%.  Go to your background color layer and change the layer properties to Overlay, Opacity 70%.

7.  Go to your tube again, and copy and paste as new layer to your tag (file).  Place it to the left side of the tag (see mine for idea), rename this "tube".  Feel free to resize it if necessary (I did with mine, to 95%).

8.  Take the "Berrylicious" wordart, copy and past as new layer to your tag (file), rename it 'wordart'.  Resize it by 80%, then move it straight up to the top (see my tag for idea).  Move it below your tube layer.  Go to Adjust - Color Balance - Manual Color Correction and change it to a color that goes along with the colors you are using (I used my background color).  Apply the following drop shadow to the wordart:
Vertical and Horizontal:  0
Opacity:  100
Blur:  2.00
Color:  black
Change layer properties to Overlay, Opacity 100%.

9.  Go to your materials palette and go to the Gradient tab and choose the following:
Foreground/Background (in drop down menu)
Angle:  315
Repeats:  2
Style:  Linear (the first box)
Add new raster layer (Layer - New Raster Layer) and flood fill it with your gradient 'color', rename this "frame".  Selections - Select All, Selections - Modify - Contract ... by 5 pixels.  Click on my "delete" button.  Selections - Select All ... Selections - Float ... Selections - Defloat.  You should now have marching ants around what is left of the gradient layer.  Go to Adjust - Add/Remove Noise - Add Noise and use the following settings:  
Gaussian, 50, Monochrome checked
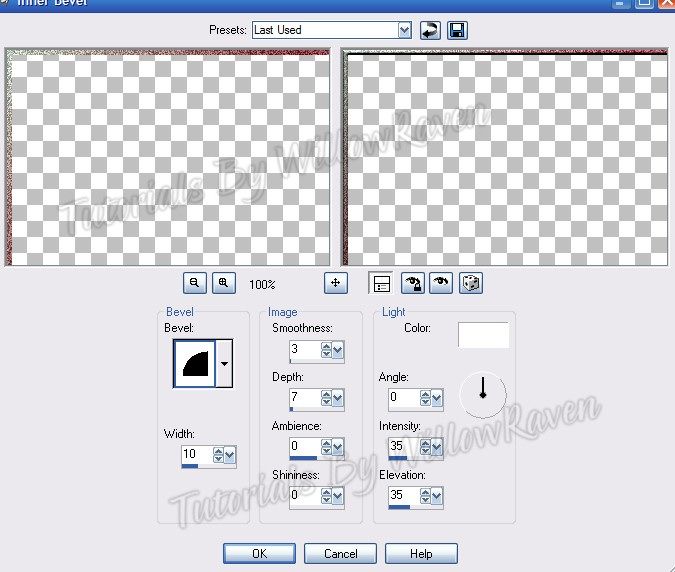
Then go to Effects - 3D Effects - Inner Bevel and use these settings:
photo SDStripes_SS8_zps2323288f.jpg
Selections - Select None.  I applied the following drop shadow to this layer:
Vertical and Horizontal:  0
Opacity:  35
Blur:  15.00
Color:  black
I then applied the following drop shadow to my tube layer:
Vertical:  5
Horizontal:  -5
Opacity:  45
Blur:  10.00
Color:  black

Activate your crop tool, and click on the "merged opaque" button in the upper toolbar, and then click on the check mark to crop the tag.

10.  At this point, add your artist information (including license, if applicable), and tagger's watermark, if desired.  You can also add your name to the tag and you are done!  (If you would like to do your name the same as me, directions are below.)


To make the avatar:
1a.  Open new file - 150 pixels x 150 pixels, 72 ppi, transparent.

2a.  Go to your tag (file) and close out the following layers:  "frame", "wordart", "tube" and any crediting layers.  Go to Edit - Copy Merged.  Go to your avatar file (the 150 pixel file) and go to Edit - Paste as New Layer.  It should be centered (or pretty close to it)... feel free to move it around if it isn't centered.  Activate your crop tool, and click on the "merged opaque" button in the upper toolbar, and then click on the check mark to crop the tag.

3a.  Activate your crop tool, and click on the "merged opaque" button in the upper toolbar, and then click on the check mark to crop the tag.

4a.  follow step #9 (above).  

5a.  With your tube:  copy/paste as new layer, feel free to resize the image if needed (I resized mine to 40%).  Sharpen if needed and apply the previous drop shadow used for the tube.

6a. Add your artist information (including license, if applicable), and tagger's watermark, if desired.  You can also add your name/initials to the avatar/icon and you are done!  


~NOTE~  For name/text:

I did the text at size 56, stroke 2.0 .. foreground and background colors the same as used in tutorial... kern: 0.0
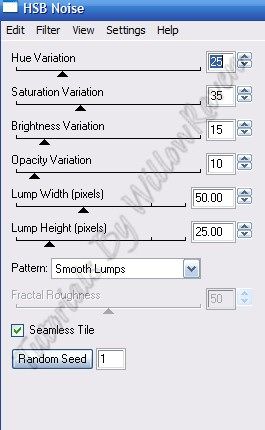
I applied Eye Candy 4000 - HSB Noise with the following settings:
photo SDStripes_SS9_zpsae9ee5f7.jpg
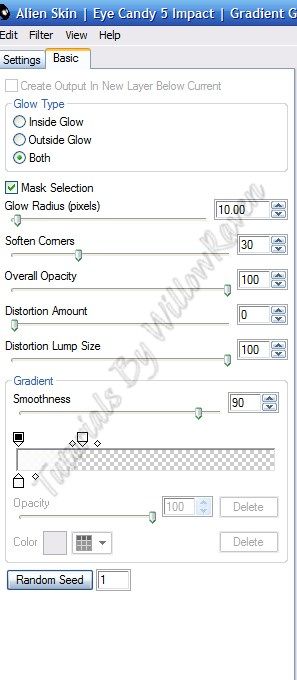
And then I used Eye Candy 5 Impact - Gradient Glow with the following settings:
photo SDStripes_SS10_zpsbbc3745c.jpg
And then used the following drop shadow
Vertical :  3
Horizontal:  -2
Opacity:  45
Blur:  8.00
Color:  black 
Shadow on new layer: unchecked
Change layer properties to Luminance (Legacy), Opacity 100%
and you are done!

If you make anything with this - or any of my - tutorials, please share?  I'd love to see it, and post it to the blog!

Thanks so much for checking out my tutorials!


Monday, September 6, 2010

URW Learn Forum Set Tutorial

URW Learn Tutorial

This is what we will be making

Photobucket

Photobucket

Moderate level - Some knowledge of PSP is needed.

Materials Needed

Paint Shop Pro (used Version 9, but can be done on any version)
Tube by UnrulyWitch, who is an FTU licensed artist at Mistaken Art (MTA) HERE

Filters Needed:

Mosaic Glass (comes with PSP)
Distort - Radial Zig Zag (freeware, HERE)
Mura Meister - Copies (freeware, HERE)
AAA Foto Frame (freebie)
Eye Candy 5 Impact - Gradient Glow


Fonts used:

FFF Fuego (for copyright info)
Quasart (for name - freeware)


Additional supplies: HERE

(wordart from Scrappy Expressions - Melissa, now known as Sentimental Style, and cross hatch texture - put in your texture folder in PSP)


Directions

1. Open PSP. Open New File, 600 pixels x 250 pixels, 72 pixels/inch resolution, transparent. Open your tube, duplicate, close the original.

2. Chose a dark color from the tube for your foreground, a light color for your background. Using those colors, chose gradient from the materials palette, and the cross-hatch texture. You want to use the following settings for your gradient:

Style: radial
Angle: 45
Radial: 5
Invert: checked
Horizontal: 50
Vertical: 50

Texture: checked
have the Hatch Fine showing in your drop down menu

click OK

Flood fill your layer with the gradient. Right click on the layer in the layer palette - go to Merge - Merge All - Flatten.

3. Go to Effects - Texture Effects - Mosaic Glass and use the following settings:

Photobucket

4. Go to Distort - Radial Zig Zag and use the following settings:

Roughness: 0
Amplitude: 118
Frequency: 155

5. Copy and paste your tube, then move to the left side of the layer. Duplicate, and move that to the right side. Merge Down, then duplicate it twice (so you will have 3 - the original and 2 copies). Close out the top of them - you will work on the middle and bottom. Resize the middle one (the top of the unhidden) by 85% (all layers UNchecked). Go to Adjust - Blur - Gaussian Blur and use the following setting: Radius: 2.00. Go to the original and go to Adjust - Blur - Gaussian Blur and use the following setting: Radius 6.00. Then, for each, go to the layer palette, right click on it, and apply the following settings:

Blend Mode: Luminance (Legacy)
Opacity: 50
Link Set: 0

6. Go to the hidden duplicated layer and unhide it. Apply the Mura Meister - Copies filter with the following settings:

Random
Wraparound
Blend Mode
*Wallpaper
Number: 20
Shift X / Shift Y: 50
Angle / Rotation / Phase: 0
Cycle: 100
Attenuation: 0
Scale: 100
Tile Gap / Thru BG Range: 0
Thru BG Smooth: 30
Fade Out: 0
Fade Out to BG: unchecked

Click OK. Go to the layer palette, right click on it, and apply the following settings:

Blend Mode: Luminance (Legacy)
Opacity: 20
Link Set: 0

7. Apply tube, move it to the right side of the tag (or place as desired). Apply favorite drop shadow setting.

8. Copy and paste wordart, place on the left side of the tag. Apply Eye Candy 5 Impact - Gradient Glow with the following settings:

Glow Type: Outside Glow
Mask Selection: checked
Glow Radius: 11.00
Soften Corners: 35
Overall Opacity: 100
Distortion Amount: 0
Distortion Lump Size: 100
Gradient Smoothness: 92

move the slider to where you like it - try not to make it too 'fat'.
I used a very very pale shade of the light color I used for my gradient.

Then apply the following drop shadow to the wordart:

Vertical: 1
Horizontal: 0
Opacity: 50
Blur: 2.00
Color: very very dark shade of the dark color you used for your gradient.
Apply drop shadow AGAIN.

9. Duplicate the wordart. Go to the lower layer of the word art, then go to Adjust - Blur - Gaussian Blur and use the following setting: Radius 3.00. Then go to the layer palette, right click on it, and apply the following settings:

Blend Mode: Multiply
Opacity: 100
Link Set: 0

10. Go to Edit - Copy Merged - Paste as New Image. Apply the AAA Frames - Foto Frame and use the following settings:

Width: 4
Brightness: -48
Stroke: 0
Matte: 1
Red: 18 (*)
Green: 11 (*)
Blue: 2 (*)
Opacity: 98
Negative: unchecked
More Shadow: checked

(*) keep in mind that these will be flexible, depending on the colors you are using...these are what I used for mine.

11. Crop tag to 600 pixels wide, 250 pixels high. Apply © information and place where desired. (I used the previous gradient glow setting on my © info, then used Luminance Legacy with Opacity of 85 on it.)

And that is it for the forum tag. For the icon tag, simply take your selection tool, and mark out a large square around the area of the forum tag that you desire (I used the angel/tube, put it kind of to the right of the square.) Make sure the box is nice and big. Copy Merged then Paste as new image. Apply the AAA Frames - Foto Frame filter with the previous settings, then put the proper © information on it.

For the name and the initial for the icon, I used the font Quasart, with the dark shade of the dark color used for the gradient. I then applied Eye Candy 5 Impact Gradient Glow with the following settings:

Photobucket

(I used the lighter shade of my gradient for the first color, and the darker shade of my gradient for the second color)

And then the following drop shadow:

Vertical: 1
Horizontal: 0
Opacity: 50
Blur: 4.00
color: black
And then applied it AGAIN.

I saved my final tag/icon as jpg.

And that is it!!

I hope you enjoyed the tutorial and would love to see your results!

Tuesday, July 27, 2010

For the Love of Alysia Tutorial

For the Love of Alysia Tutorial


This is the tag we will be making:
Photobucket


Moderate level - Some knowledge of PSP is needed.


Materials Needed:
Paint Shop Pro (used Version 9, but can be done on any version)
PTU kit "Alysia" by Designs by Tishia which can be bought at Scrappin Bratz
Posers used from the kit, by Medi
Mask #03 by Yez


Filters Needed:
Blinds (comes with PSP)
Optional Filter: Eye Candy 5 Impact Gradient Glow (used for my name/text)


Fonts used:
FFF Professional (for copyright info)
Mrs Blackfort (for name/text)

Please note that I will give the drop shadow settings that I have used HOWEVER feel free to use your own settings if you would like.


1. Open PSP. Open New File: 600 pixels x 600 pixels, 72.000 pixels/inch resolution, transparent. At this time, also open your mask and minimize in PSP.

2. Open Paper 3... copy & paste it as new layer. Resize it 75%, be sure "resize all layers" is UNchecked. Go to Layers - New Mask Layer - From Image and use these settings:

Photobucket

Go to your layer palette, right click on the background paper layer, then go to Merge - Merge Group. Duplicate layer, then go the bottom duplicate and go to Adjust - Blur - Gaussian Blur with a blur of 25.00, click OK. Go to the top of the 2 and apply the following drop shadow:

Vertical and Horizontal: 0
Opacity: 75
Blur: 8.00
Color: black
Shadow on new layer: unchecked

3. Open one of the frames in the kit (I used Frame 3). Copy and paste as new layer then resize it 60% (be sure "all layers" is UNchecked). It should already be centered within the stars from the mask, which is good because that is where you want it. Feel free to apply your favorite drop shadow at this point (or wait til end and apply as desired).

4. Open one of the hearts in the kit (I used heart 3). Copy and paste as new layer then resize it 90% (be sure "all layers" is UNchecked). The go to Image, Rotate - Free Rotate and use these settings:

Direction: left
Degrees: free, 25.00
All Layers: unchecked
Rotate single layer around cavas: unchecked

then move the heart to just below the frame layer and center and sharpen, as needed.

5. Open one of the swirls in the kit (I used swirl 1). Copy and paste as new layer then resize it 85% (be sure "all layers" is UNchecked). Move this to just above the blurred mask layer. Apply following drop shadow settings:

Vertical and Horizontal: 0
Opacity: 75
Blur: 4.00
Color: black
Shadow on new layer: unchecked

6. Move heart (my heart 3) to above the frame, and resize it by 85% (be sure "all layers" is UNchecked). Click on the inside of the heart with your magic wand. Go to Selections - Modify - Expand ....by 5.00 pixels - click ok.

7. Copy and paste one of the tubes you are using (you will want one with a close up of the face, or a clear image of the face - I used thefallen3). Copy and paste, then center it above the heart (resize as needed too). When you are satisfied, go to Selections - Invert and then click on the Delete key. Go to Selections - Select None. Go to the layer palette and right click on the layer with the face. Go to Properties and use these settings:

Blend Mode: Luminance (Legacy)
Opacity: 75%
Link Set: 0
Layer is Visible: checked
Lock transparency: unchecked
Highlight in layers palette: unchecked

8. Copy and paste poser thefallen5. Go to Image - Mirror. Resize by 60% (be sure "all layers" is UNchecked) then move it around so that she is standing to the left of the heart (see my tag for placement idea). Apply your favorite drop shadow setting.

9. Go to the blurred mask layer, make active. Go to Effects - Texture Effects - Blinds and apply these settings:

Width: 5
Opacity: 85
Color: black
Horizontal: unchecked
Light from left/top: unchecked

10. At this point, continue to decorate the tag as desired with supplied elements. When you are satisfied, resize to 500 pixels x 500 pixels, "all layers" CHECKED. Feel free to use the crop tool to crop out any additional edges from the tag.

11. Apply crediting information and watermark. Apply and desired drop shadows to the layers. When satisfied, merge visible. Apply name text and then you are done!

Thank you so much for checking out my tutorial and I would love to see your results if you try it!

Tuesday, June 29, 2010

Shamrock Pixie Tutorial

Shamrock Pixie Tutorial

This is the tag we will be making

Photobucket


Moderate level - Some knowledge of PSP is needed.


Materials Needed

Paint Shop Pro (used Version 9, but can be done on any version)
PTU kit "Shamrock Pixie" by Darkmoon's Dream Designs which can be bought at Scrappin Bratz
Poser used from the kit
Kirsty's Scraps Mask #24


Filters Needed

Xero-Porcelain - FTU filter
Blinds (comes with PSP),


Optional Filter

Eye Candy 5 Impact Gradient Glow


Fonts used
FFF Fuego (for copyright info)
Doodle Journal - PTU font (for name/text)


Please note that I will give the drop shadow settings that I have used HOWEVER feel free to use your own settings if you would like.


1. Open PSP. Open New File: 600 pixels x 600 pixels, 72.000 pixels/inch resolution, transparent. At this time, also open your mask and minimize in PSP.

2. Open one of the frames in the kit (I used Frame04). Copy and paste as new layer on your blank "new file" then resize it 80% (be sure "all layers" is UNchecked). Copy and paste Paper14 as new layer then resize it 70% (be sure "all layers" is UNchecked). Move to just below your frame layer. Click inside the frame making sure that the entire area inside is clicked, then close off the frame layer, then make the paper layer active. Go to Selections - Select All, Selections - Float, Selections - Defloat. The go to Selections - Modify - Expand - by 10 pixels - then click OK. Go to Selections - Invert and then click your Delete key. Selections - Select None and then click on the frame layer, making it visible again. Go to Selections - Select All, Selections - Float, Selections - Defloat then apply your Xero/Porcelain effect using the following settings:

Photobucket

Go to Selections - Select None (to remove marching ants).

3. Copy and paste Paper14 as new layer then resize it 75% (be sure "all layers" is UNchecked). Move to just below your frame background layer. Go to Layers - New Mask Layer - From Image and apply these settings:

Photobucket

Go to the layer palette - right click on the "Group - Raster 2" layer, Merge - Merge Group. Feel free to close the mask that you have minimized.

4. Copy and paste one of the pixies (I used Pixie01) as new layer then resize it 35% (be sure "all layers" is UNchecked). Move to top in the layer palette. Move to left side of tag (see my tag for idea).

5. Copy and paste the mushroom as new layer then resize it 25% (be sure "all layers" is UNchecked). Move to just below the pixie layer. Duplicate then resize the duplicate by 75% (be sure "all layers" is UNchecked), then place them as shown on tag. Do the same thing with one of the chests (I used Chest02) - resize to 35% instead, and do not duplicate - and move that to the layer between the pixie and the mushroom.

6. Copy and paste one of the swirls (I used Swirl01) as new layer then resize it 60% (be sure "all layers" is UNchecked). Move it to layer just under the mushroom, then place it behind his head (as shown on tag). Duplicate swirl, then go to Image - Flip, then Image - Mirror. Move the swirl around til it is placed somewhat on the right bottom of the frame (see my tag for idea). If desired, resize the bottom swirl by 85% - some of it still might run off the area, that is ok. Use Eye Candy 5 Impact, Gradient Glow and these settings:

Photobucket

7. Copy and paste Splatter01 as new layer then resize it 60% (be sure "all layers" is UNchecked). Move to just below your frame layer, then move it around so it is somewhat centered under the frame. Go to Effects - Texture Effects - Blinds and use the following settings:

width: 5
opacity: 25
color: black
horizontal: unchecked
light from left/top: unchecked

Then go to Adjust - Brightness and Contrast - Brightness/Contrast and use these settings:

brightness: 15
contrast: 0

Go to Eye Candy Impact, Gradient Glow and use the previous settings.

8. Copy and paste Shamrocks01 as new layer then resize it 50% (be sure "all layers" is UNchecked) then go to Image - Rotate - Free Rotate using these settings:

Direction: right
Degrees: 90
All Layers: unchecked
Rotate Single layer around canvas center: unchecked

Center it (somewhat) within the frame, as seen on my tag. Sharpen, if needed.

9. Copy and paste Grass03 as new layer then resize it 40% (be sure "all layers" is UNchecked), then place it just above the mushroom layer.

10. Copy and paste Flower07 as new layer then resize it 35% (be sure "all layers" is UNchecked), then place it just above the top swirl layer, as seen on the tag.

11. Apply drop shadow to all layers (except mask layer and pixie layer) with these settings - or your preferred settings:

vertical: 2
horizontal: 0
opacity: 75
blur: 7.00
color: black
shadow on new layer: unchecked

(note: on frame layer, I applied the drop shadow twice)


On the pixie layer, use the following settings:

vertical: 0
horizontal: 0
opacity: 70
blur: 20.00
color: black
shadow on new layer: unchecked

(note: I didn't apply a drop shadow on the mask layer, however you may if you prefer.)

12. At this point, feel free to decorate further, using elements in the kit. When you have it all decorated, go to you layer palette, right click, then Merge - Merge Visible all the layers. Then resize to 450 pixels x 450 pixels - all layers checked. Go to Adjust - Sharpen. (You might need to do this more than once.)

13. Apply copyright information and tagger watermark. (I used Pixelette for mine.)

14. Merge Visible, save in .png format (to retain background transparency).

15. Apply name and place in center of bottom of frame area (see my tag for idea). For mine I used the font Doodle Journal, with #33582a as my foreground and background colors. I did stroke 3.0 and size 48 on the font, and used the following Eye Candy 5 Impact - Gradient Glow settings:

Photobucket


and then did the following drop shadow settings:

Vertical: 2
Horizontal: 0
Opacity: 75
Blur: 8.00
Color: Black
Shadow on New Layer: Not checked

And that's it!!

Thank you so much for checking out my tutorial and I would love to see your results!


*~*~*~*~*~*~*~*~*~*~*~*

Check out this wonderful result from Lorri, a fellow member on the Shewolf's Domain groups:

Photobucket

Absolutely amazing! Thank you Lorri, for sharing your result!!