SD Berrylicious Forum Tutorial
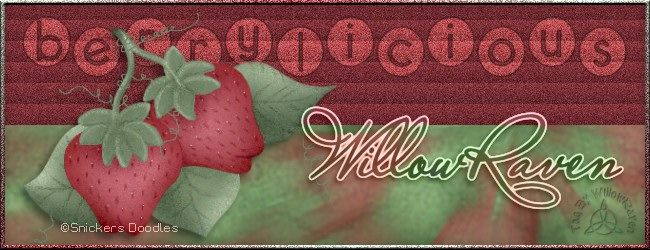
This is the tag we will be making:

Easy level - Basic knowledge of PSP is needed.
Materials Needed
Paint Shop Pro (used Version 9, but can be done on any version)
Scraps -- None
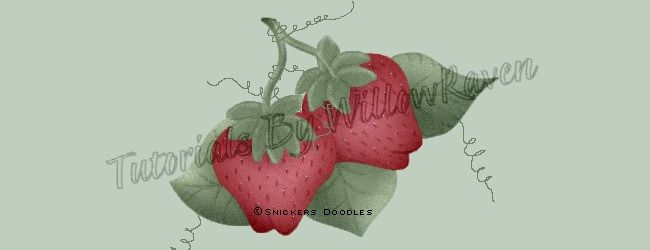
Tube of Choice - I am using a tube by FTU artist "Snickers Doodles" - tubes can be found in most © compliant tube share groups.
You could also use an element from a kit, or accent/embellishment - the sky is the limit!
"Berrylicious" Wordart made by me - can be downloaded HERE.
Filters Needed
Reflections/Pattern - comes with PSP
Blinds - comes with PSP
Inner Bevel - comes with PSP
Drop Shadow - comes with PSP
Optional Filters (for Name/Text)
Eye Candy 4000 - HSB Noise
Eye Candy 5 Impact - Gradient Glow
Fonts used
Miss LeGatees (for name/text),
Grixel Kyrou 9 Regular (for copyright info)
Please note that I typically add my drop shadows last. I will give the drop shadow settings that I have used at the end of the tutorial HOWEVER feel free to use your own settings if/when you would like.
1. Install the font(s). (Alternative: You can open and minimize the font; it should show in PSP. I use a font program called Cfont Pro (http://www.veign.com/application.php?appid=101) - it temporarily installs the font and will uninstall it when you shut down your computer.)
2. Open a new file, 650 pixels x 250 pixels, 72 ppi, transparent. At this time, also Shift+D on your image (this will make a copy of your image) - then close out the original, then minimize it for the time being.
3. Go to your materials palette and choose a medium-to-dark color from your tube for the foreground color and a medium-to-light color from your tube as your background color. (I used #88343c for my foreground and #bfcebe for my background.... you could also go with complemetary or even contrasting colors of the tube colors, if you desire.) Add new raster layer (Layer - New Raster Layer) and flood fill it with your background color, rename this "background color". Go to your tube and copy and paste it as a new layer. You should now have something like this:
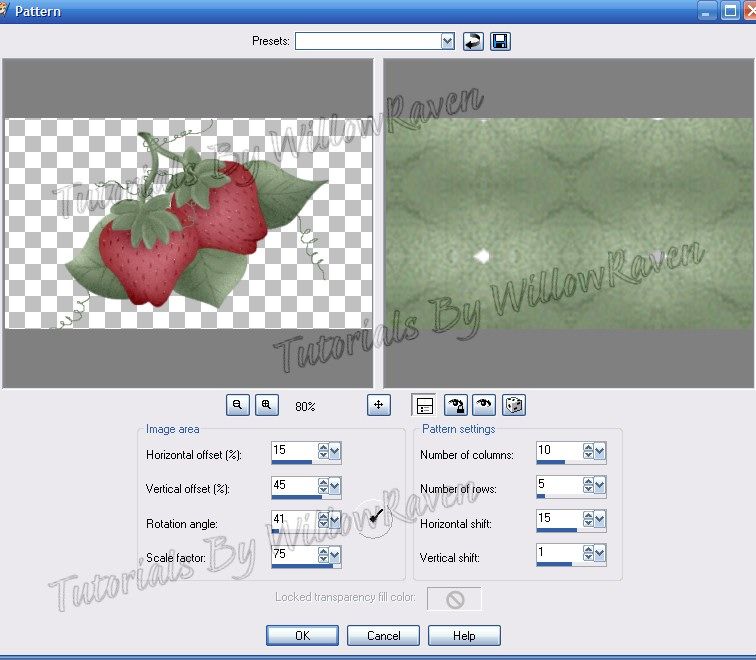
4. Go to Effects - Reflection Effects - Pattern and apply the folowing settings:
 5. Activate "Selection" in your "Selection Tool":
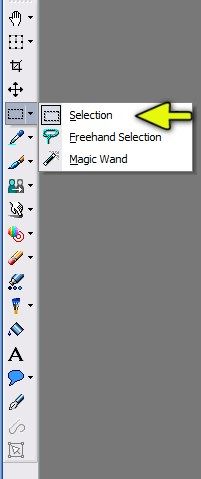 and then click on the "Custom Selection":
 and apply the following settings:
Top: 0 / Left: 0 / Right: 650 / Bottom: 125
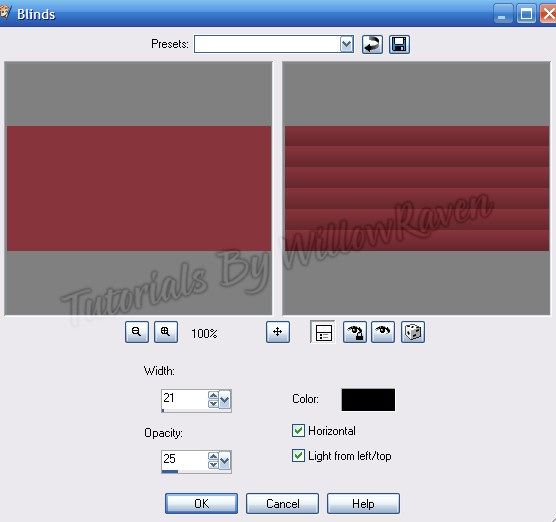
Add new raster layer (Layer - New Raster Layer) and flood fill it with your foreground color, and rename it "foreground color". With the selection still activated (showing the 'marching ants'), go to Effects - Texture Effects - Blinds and apply the following settings:
and apply the following settings:
Top: 0 / Left: 0 / Right: 650 / Bottom: 125
Add new raster layer (Layer - New Raster Layer) and flood fill it with your foreground color, and rename it "foreground color". With the selection still activated (showing the 'marching ants'), go to Effects - Texture Effects - Blinds and apply the following settings:
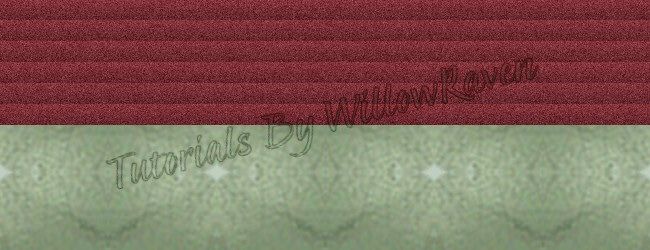
 While still active, Adjust - Add/Remove Noise - Add Noise and use the following settings:
Gaussian, 15, Monochrome checked
You may then de-select your layer (Selections - Select None).
You should now have something like this:
While still active, Adjust - Add/Remove Noise - Add Noise and use the following settings:
Gaussian, 15, Monochrome checked
You may then de-select your layer (Selections - Select None).
You should now have something like this:
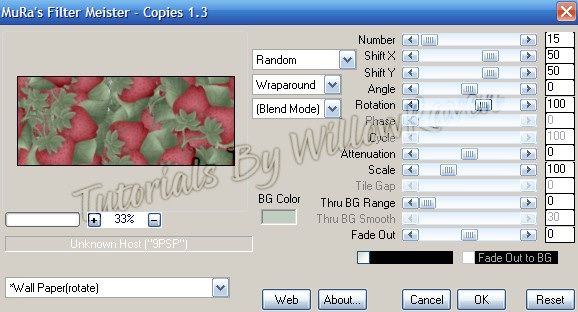
6. Go to your tube and copy and paste as new layer to your tag (file). Using Mura's Meister-Copies filter, apply these settings:
 Rename it "Copies", then move this layer below your background color layer, and change the layer properties to Multiply, Opacity: 85%. Go to your background color layer and change the layer properties to Overlay, Opacity 70%.
7. Go to your tube again, and copy and paste as new layer to your tag (file). Place it to the left side of the tag (see mine for idea), rename this "tube". Feel free to resize it if necessary (I did with mine, to 95%).
8. Take the "Berrylicious" wordart, copy and past as new layer to your tag (file), rename it 'wordart'. Resize it by 80%, then move it straight up to the top (see my tag for idea). Move it below your tube layer. Go to Adjust - Color Balance - Manual Color Correction and change it to a color that goes along with the colors you are using (I used my background color). Apply the following drop shadow to the wordart:
Vertical and Horizontal: 0
Opacity: 100
Blur: 2.00
Color: black
Change layer properties to Overlay, Opacity 100%.
9. Go to your materials palette and go to the Gradient tab and choose the following:
Foreground/Background (in drop down menu)
Angle: 315
Repeats: 2
Style: Linear (the first box)
Add new raster layer (Layer - New Raster Layer) and flood fill it with your gradient 'color', rename this "frame". Selections - Select All, Selections - Modify - Contract ... by 5 pixels. Click on my "delete" button. Selections - Select All ... Selections - Float ... Selections - Defloat. You should now have marching ants around what is left of the gradient layer. Go to Adjust - Add/Remove Noise - Add Noise and use the following settings:
Gaussian, 50, Monochrome checked
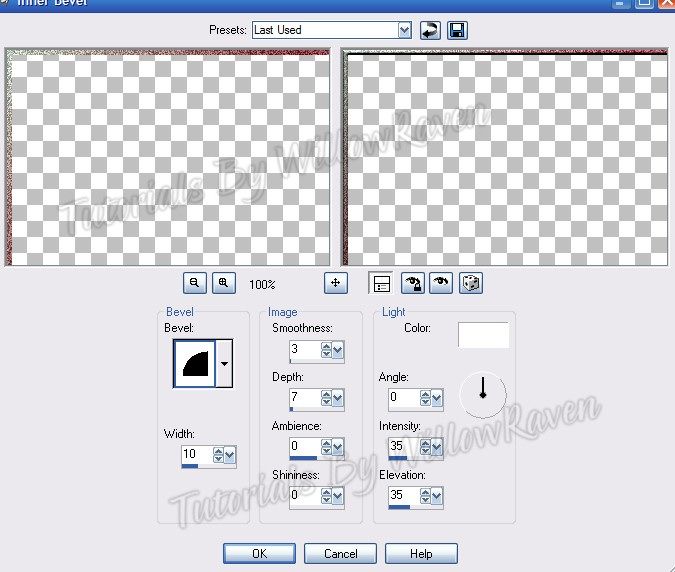
Then go to Effects - 3D Effects - Inner Bevel and use these settings:
 Selections - Select None. I applied the following drop shadow to this layer:
Vertical and Horizontal: 0
Opacity: 35
Blur: 15.00
Color: black
I then applied the following drop shadow to my tube layer:
Vertical: 5
Horizontal: -5
Opacity: 45
Blur: 10.00
Color: black
Selections - Select None. I applied the following drop shadow to this layer:
Vertical and Horizontal: 0
Opacity: 35
Blur: 15.00
Color: black
I then applied the following drop shadow to my tube layer:
Vertical: 5
Horizontal: -5
Opacity: 45
Blur: 10.00
Color: black
Activate your crop tool, and click on the "merged opaque" button in the upper toolbar, and then click on the check mark to crop the tag.
10. At this point, add your artist information (including license, if applicable), and tagger's watermark, if desired. You can also add your name to the tag and you are done! (If you would like to do your name the same as me, directions are below.)
To make the avatar:
1a. Open new file - 150 pixels x 150 pixels, 72 ppi, transparent.
2a. Go to your tag (file) and close out the following layers: "frame", "wordart", "tube" and any crediting layers. Go to Edit - Copy Merged. Go to your avatar file (the 150 pixel file) and go to Edit - Paste as New Layer. It should be centered (or pretty close to it)... feel free to move it around if it isn't centered. Activate your crop tool, and click on the "merged opaque" button in the upper toolbar, and then click on the check mark to crop the tag.
3a. Activate your crop tool, and click on the "merged opaque" button in the upper toolbar, and then click on the check mark to crop the tag.
4a. follow step #9 (above).
5a. With your tube: copy/paste as new layer, feel free to resize the image if needed (I resized mine to 40%). Sharpen if needed and apply the previous drop shadow used for the tube.
6a. Add your artist information (including license, if applicable), and tagger's watermark, if desired. You can also add your name/initials to the avatar/icon and you are done!
~NOTE~ For name/text:
I did the text at size 56, stroke 2.0 .. foreground and background colors the same as used in tutorial... kern: 0.0
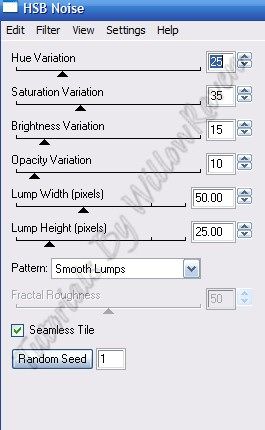
I applied Eye Candy 4000 - HSB Noise with the following settings:
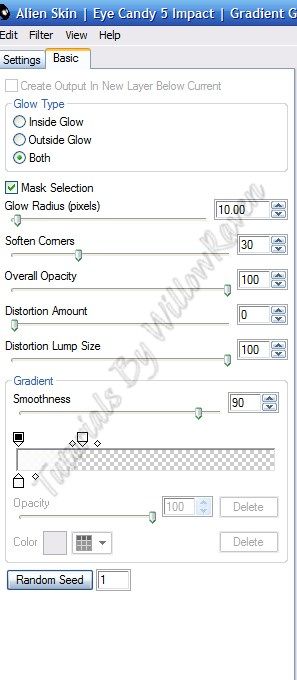
 And then I used Eye Candy 5 Impact - Gradient Glow with the following settings:
 And then used the following drop shadow
Vertical : 3
Horizontal: -2
Opacity: 45
Blur: 8.00
Color: black
Shadow on new layer: unchecked
Change layer properties to Luminance (Legacy), Opacity 100%
and you are done!
And then used the following drop shadow
Vertical : 3
Horizontal: -2
Opacity: 45
Blur: 8.00
Color: black
Shadow on new layer: unchecked
Change layer properties to Luminance (Legacy), Opacity 100%
and you are done!
If you make anything with this - or any of my - tutorials, please share? I'd love to see it, and post it to the blog!
Thanks so much for checking out my tutorials!