I have a new tutorial for you all!! This is the tag we will be making:
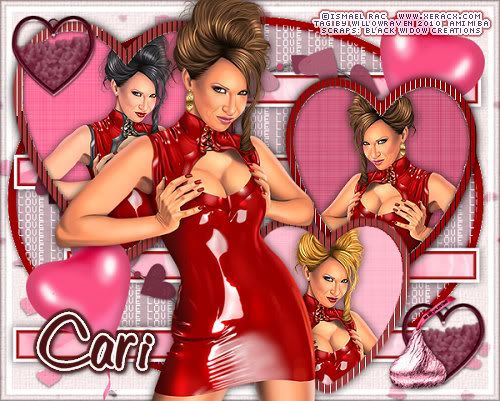
Moderate level - Some knowledge of PSP is needed.
Materials Needed
Paint Shop Pro (used Version 9, but can be done on any version)
PTU kit called Mi Amor by BlackWidowCreations which can be bought at Scrappin' With Friends Tag Template #9 from Purple Dragonfly Creations
Tube by Ismael Rac (Fantasy Girl) which is available through AMI, and must have a license to use
Vix Mask Valentine 13
Filters Needed: Eye Candy 5 Impact - Gradient Glow, Tramages - Tow the Line, Filters Unlimited 2 (Paper Textures and Buttons & Frames)
Fonts used:
Pixelette (for copyright info)
DIRECTIONS
1. Open PSP
2. Copy Template then click on Shift + D to duplicate entire template. Close original template.
3. Open mask in PSP then minimize. We will be using it in a little bit.
4. Open Paper20 and copy and paste on to your template. Make the circle background layer active. Go to Selections - Select All... Selections - Float then Selections - Defloat. Click on the paper layer, then go to Selections - Invert then click on your delete button. Go to Selections - Select None.
5. Close out the Paper20 layer and make the circle background layer active again. Click on the outer black edge with your magic wand, then go to Adjust - Color Balance - Manual Color Correction and choose a color (dark) from the tube you are using. With the edge still selected, apply the following drop shadow:
Vertical: 0
Horizontal: 0
Opacity: 75
Blur: 8.00
color: Black
Shadow on New Layer: unchecked
Go to Selections - Select None.
6. Go back to the Paper20 layer, make active, then right click on it and go to Properties. Choose Overlay, Opacity 80 (everything else leave it as it is), then click OK.
7. Go to Love WordArt layer, make active. Go to Adjust - Color Balance - Manual Color Correction and change the color from black to white. Click OK.
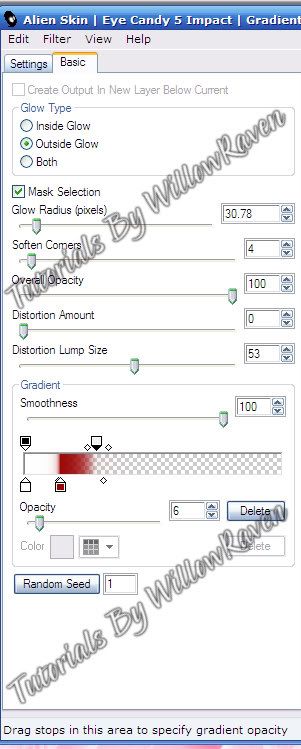
8. Close out all the layers except the 4 rectangle layers. Merge Visible. Keeping that layer active, go to Selections - Select All... Selections - Float then Selections - Defloat. Copy and paste Paper11 on to the template, then make that layer active, then go to Selections - Invert then click on your delete button. Go to Eye Candy 5 Impact, Gradient Glow and use the following settings (note, the color I used is the same color I used for the outer edge of the circle background, earlier):
Go to Selections - Select None, then apply the following drop shadow:
Vertical: 0
Horizontal: 0
Opacity: 60
Blur: 15.00
color: Black
Shadow on New Layer: unchecked
Delete the 4 rectangles layer, then unhide the largest heart layer.
9. Click on the black egding of the largest heart layer and do to it what you did with the circle background, choosing a complementing color from your tube. Go to Selections - Select None. Using your magic wand, click on the inner part of the heart. Click delete (to remove the gray part of the heart). Go to Selections - Modify - Expand ... by 3 pixels, then click OK. Choose a paper (I am using Paper18) and copy and paste it on to the template. Go to Selections - Invert then click on your delete button. Move to just below your heart 'frame' that you have made. Keeping that background active and the marching ants on, copy and paste your tube to the template. Place it where you wish, then click delete (to remove the part of the tube outside of the area). Go to Selections - Select None to remove the marching ants. Apply your favorite drop shadow to the tube. Go back to the 'frame', apply the Tramages filter - Tow the Line with the default settings, then apply the following drop shadow settings:
Vertical: 0
Horizontal: 0
Opacity: 75
Blur: 8.00
color: Black
Shadow on New Layer: unchecked
With only those 3 layers open (all others hidden), go to Merge - Merge Visible.
Do the same thing with the other 2 hearts, keeping in mind that you can slightly alter the color for the heart 'frame' area to give it a different look. Feel free to also use different papers for the background and to mess around with the settings in Tramages.
Apply the following drop shadow on each finished heart:
Vertical: 0
Horizontal: 0
Opacity: 75
Blur: 15.00 c
olor: Black
Shadow on New Layer: unchecked
10. Move the hearts around so they are to your liking. I just moved them out a little to the outer edges. Then I used on of the close up images of the tube and copied and pasted it to the top of my template, then resized it by 85%. I moved her so that she was slightly off to the left. I applied the same drop shadow that I did to the smaller tube images.
11. Clicking on the very bottom layer, copy and paste Paper23 on to the template. Bring to bottom, then apply the mask to that layer by going to Layers - New Mask Layer - From Image and use these settings:
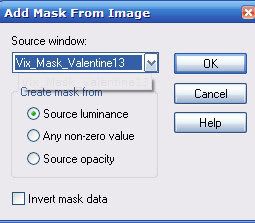
Merge group. Apply a slight drop shadow to the mask.
Go back to the very bottom layer and flood fill with a very pale color from your tube. Go back to mask layer, and merge down. Go to Filters Unlimited 2 and go to Paper Textures, Canvas-Coarse and use these settings:
Intensity: 29
Lightness: 82
Click Apply. Then go in to Filters Unlimited 2 again, and go to Buttons and Frames, Glass Frame 2 and use these settings:
Frame size: 15
Contrast: 103
Click Apply.
12. Copy and paste Frame3 on to your template. Move it to under your 3 heart frames, then apply your favorite drop shadow. 13. Use additional elements to decorate your tag. 14. When you are happy with your tag, merge visible, then resize it to 500 pixels x 401 pixels (be sure all layers is checked). Sharpen if needed. 15. Be sure to include copyright information on your tag.
For the name, I used color #4c1212 for both foreground and background, width 2.0, size 48, then applied Gradient Glow settings:
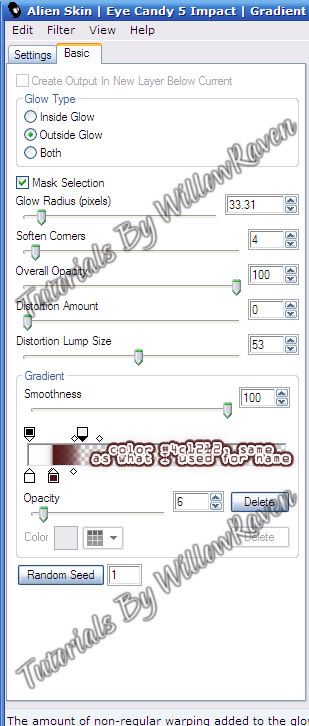
and the following drop shadow:
Vertical: 1
Horizontal: 1
Opacity: 65
Blur: 4.00
color: Black
Shadow on New Layer: unchecked
And you're all done! Would love to see what you come up with!!




0 comments :
Post a Comment