skip to main
|
skip to sidebar
Cutie Bug Tutorial
This is the tag we will be making:  Moderate level - Some knowledge of PSP is needed. Materials Needed:
Paint Shop Pro (used Version 9, but can be done on any version) PTU kit "Cutie Bug" by Darkmoon's Dream Designs which can be bought at Scrappin Bratz
Posers used from the kit
Chelle/WeeScotsLass Mask #223 Filters Needed: Mosaic-Glass (comes with PSP) Mosaic-Antique (comes with PSP) Optional Filter:
Eye Candy 5 Impact Gradient Glow Fonts used: Pixelette (for copyright info) Walrus Gumbo (for name/text) DIRECTIONS
1. Open PSP. Open New File: 600 pixels x 600 pixels, 72.000 pixels/inch resolution, transparent. At this time, also open your mask and minimize in PSP.
2. Open Paper10, copy and paste as new layer onto 'new file'. Resize by 75%, all layers UNchecked. Go to Layers - New Mask Layer - From Image and apply these settings: 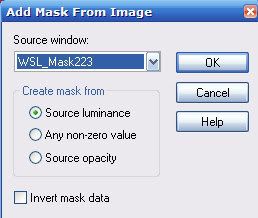 Go to the layer palette - right click on the "Group - Raster 2" layer, Merge - Merge Group. Feel free to close the mask that you have minimized.
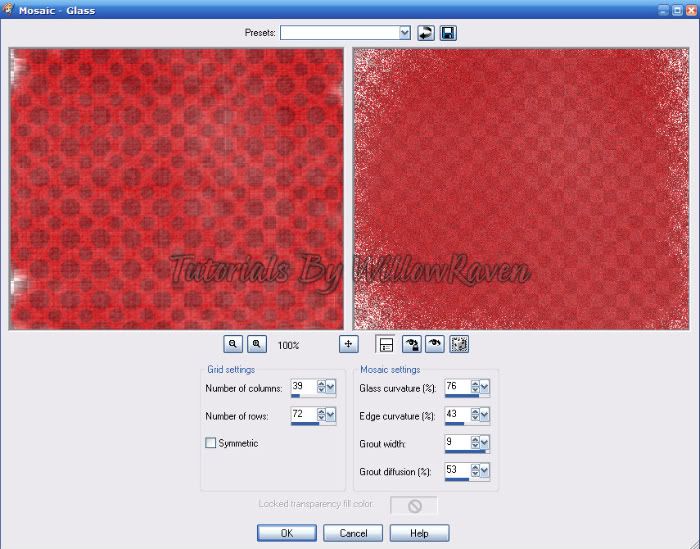
2. Go to Effects - Texture Effects - Mosaic-Glass and apply these settings:
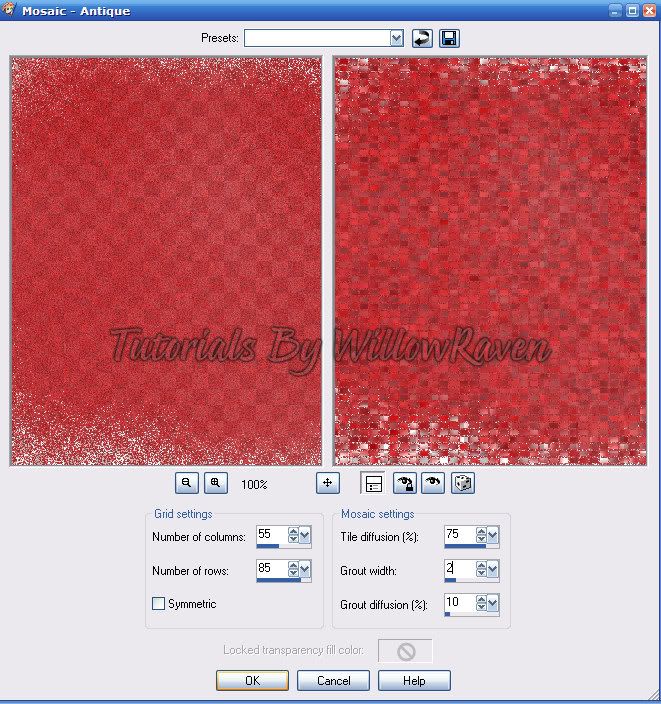
 3. Go to Effects - Texture Effects - Mosaic-Antique and apply these settings:
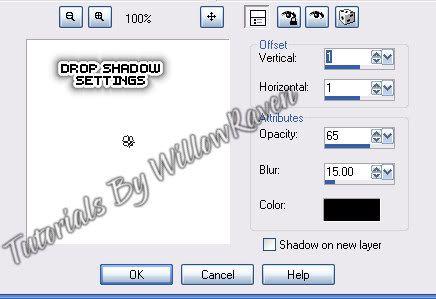
  4. Select one of the round frames (I am using frame 01). Copy and paste as new image. Close original. Resize frame by 65% (all layers checked). Copy and paste as new layer on to your 'tag'. Move to the top if it isn't already there. Duplicate the frame, then resize by 90% (all layers UNchecked). Apply the following drop shadow to both frames:
  5. Close out the "Group - Raster 2" layer, then make the layer with the smaller frame active. Using your magic wand tool, click inside the frame area. Go to Selections - Modify - Expand - by 20 pixels, then click "ok". Copy paper 17, then paste as new layer. Resize by 75% (all layers UNchecked). Go to Selections - Invert. Click on your "delete" key. Move to just under the larger frame. Go to Adjust - Brightness and Contrast - Brightness/Contrast and apply these settings:
Brightness: 90
Contrast: -25
Lower the layer opacity to 20. 6. Copy and paste (as new layer) Cutie Bug 01, then resize by 50% (all layers UNchecked), then again by 75% (all layers UNchecked). Center face in middle of frames. Click on your "delete" button. Go to the layer palette, right click on the layer with the face, and apply the following settings:
 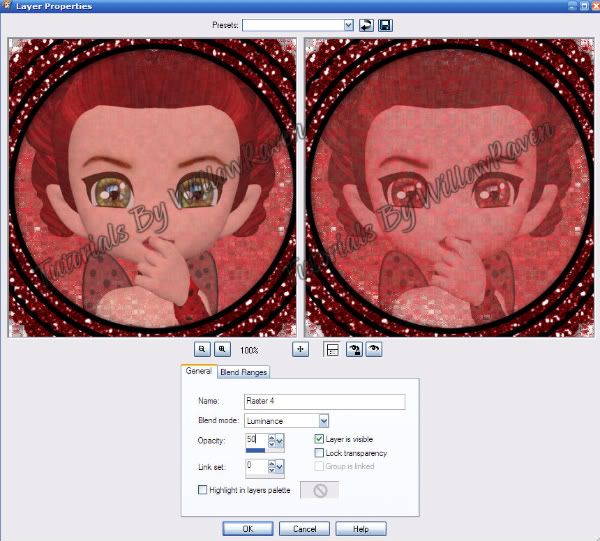 Go to Selections - Select None (to shut off the marching ants). Open your 2nd poser (I am using Cutie Bug 04). Copy and paste as new layer - resize as needed. Place above (on top) of the frame layers. Move it around, place as desired, then apply the following drop shadow settings:
Vertical: 0
Horizontal: 0
Opacity: 75
Blur: 20.00
Color: Black
Shadow on New Layer: Not checked
then apply the drop shadow again. 7. Close out all the layers EXCEPT the frame layers. Click on the outside of the largest frame, then go to Selections - Modify - Expand - by 18 pixels - click OK. The copy and paste as new layer one of the banner/wordart elements (I am using WA 01). Resize by 60% (all layers UNchecked), place as you see on the tag. Click on your "delete" key. Go to Selections - Select None. Apply drop shadow settings you used in step #6. Unhide all the closed layers. 8. Copy String 04 and paste as new layer. Resize by 45% (all layers UNchecked). Move it under your top poser AND the banner/wordart layer (see my tag for idea). With your eraser tool, delete the little bit of string that shows just beyond the frame in the bottom left area and the area inside the frame (see my tag for idea). Be careful NOT to erase any of the leaves, though! (You may need to zoom in and out to do this - I did.)
Apply the following drop shadow settings:
Vertical: 1
Horizontal: 1
Opacity: 75
Blur: 10.00
Color: Black
Shadow on New Layer: Not checked 9. Copy Bow 14, then resize by 45% (all layers UNchecked), then resize it again by 45%. Place it to the right of the banner. Apply drop shadow used in #8. Duplicate, then mirror. Move top tube to top layer (so that bow will end up being behind her). 10. At this point, feel free to decorate further, using elements in the kit. When you have it all decorated, close out the bottom layer and the "Group - Raster 2" layer, then Merge - Merge Visible all the other layers. Then resize by 85% (all layers UNchecked), then unhide the 2 closed off layers. Merge - Merge Visible (all 3 layers). Resize: 475 pixels x 475 pixels - all layers checked. Go to Adjust - Sharpen - Sharpen. 11. Apply copyright information and tagger watermark. (I used Pixelette for mine.) 12. Merge Visible, save in .png format (to retain background transparency). 13. Apply name and place under the main poser. For mine I used the font Walrus Gumbo, with black as my foreground color and #b31317 as my background color. I did stroke 2.0 and size 42 on the font, and used the following Eye Candy 5 Impact - Gradient Glow settings:
 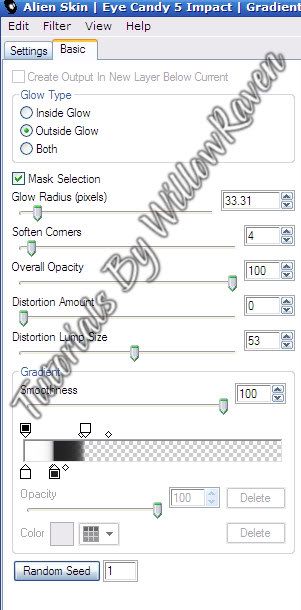 and then did the following drop shadow settings: Vertical: 1 Horizontal: 0 Opacity: 75 Blur: 5.00 Color: Black Shadow on New Layer: Not checked And that's it!!
Thank you so much for checking out my tutorial and I would love to see your results!!


0 comments :
Post a Comment