Monday, March 19, 2012
Happy Easter Tutorial
Happy Easter Tutorial
Easy to Moderate level - Some basic knowledge of PSP is needed
Materials Needed
Paint Shop Pro (used Version 9, but can be done on any version)
FTU kit by Purple Dragonfly Creations called "Hippity Hoppity Blog Train"(usually this is available via my scrap blog, however it needs serious updating, so until that is completed, the scrap kit is available via this link)
Image/Tube from Les Toil (FTU) "Sally" found HERE in supplies zipfile (there are tubes of her with 4 different colored dresses)
Happy Easter Text - also in supplies zipfile
Diana Todd's Mask #0028
Tag Template by Soaring Hawk's Nest, found HERE - you want the floral one
Filters Needed
Xero Fritilliary -- provide link
Eye Candy 5 Impact Gradient Glow -- provide link
Blinds (comes with PSP)
Fonts Used
PIXgothic7 (for copyright info)
Bistro Script (for name/text)
1. Open PSP
2. Open New Image, 600x600 pixels, resolution 72.000 pixels/inch, transparent checked
3. Open tag template - Shift+D to copy it, close the original template. Delete the top layer that has the designer's information. Resize to 525 pixels x 525 pixels, 72.000 ppi (template is made at 200.000 ppi).
4. Click on layer #2 to make active, then go to Selections - Select All.... Selections - Float .... Selections - Defloat. Copy Paper 5 and paste as new layer right above layer #2. Selections - Invert then click on the Delete button. Selections - None. Then close out layer #2 (keeping Paper 5 layer visible, rename it "flower petal"). Do the same thing with layer #3 and #4 with papers of your choice (I chose Papers 1 and 4, respectively). Feel free to resize the papers before pasting as new layer, if you would like.
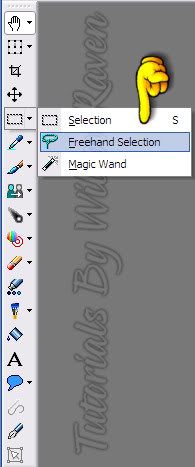
5. Go to your tube and, using the freehand tool:
Go around the image so that you end up with marching ants around it. Then copy and paste as new layer to your template (make sure it is the top layer). Center tube, and resize by 85%. Sharpen as needed.
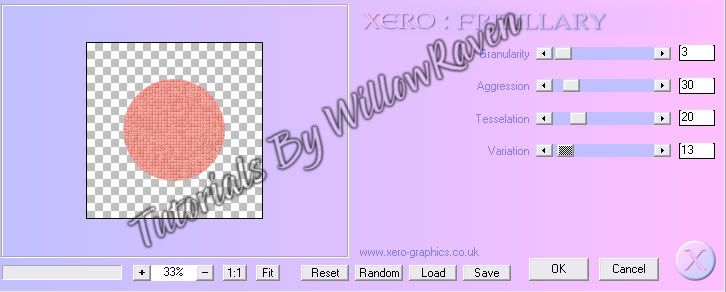
6. Go to the smallest circle (inner circle) and then go to Selections - Select All.... Selections - Float .... Selections - Defloat. Apply your Xero-Fritilliary filter with the following settings:
DO not deselect yet.
7. Go to the "Happy Easter" text that I provided in the zipfile. Copy and paste as new layer right above the circle you applied the filter to. Go to Selections - Invert then click on the Delete button. Selections - Select None.
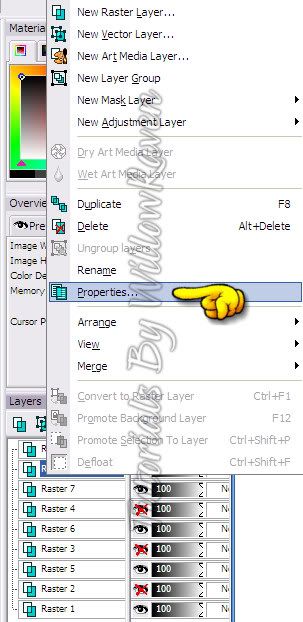
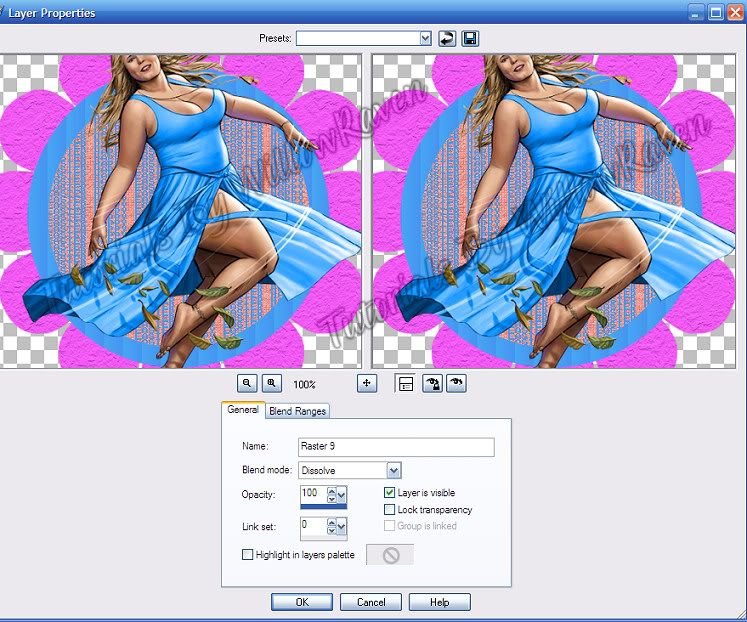
8. Recolor the text to something other than the black color it is (I changed it to the blue that matches the paper in the kit.) Go to your layer palette, right click on the text layer, then go to Properties:
And when the Properties window opens, apply these settings:
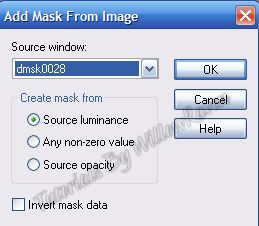
9. Open on of the papers in the kit (choose one that doesn't have a lot of obvious design - I chose paper 2.) Copy & paste as new layer, move to bottom. Resize by 75%, "resize all layers" UNchecked. Open mask in PSP then minimize. Go to Layers - New Mask Layer - From Image and use these settings:
Go to your layer palette, right click on the background paper layer, then go to Merge - Merge Group.
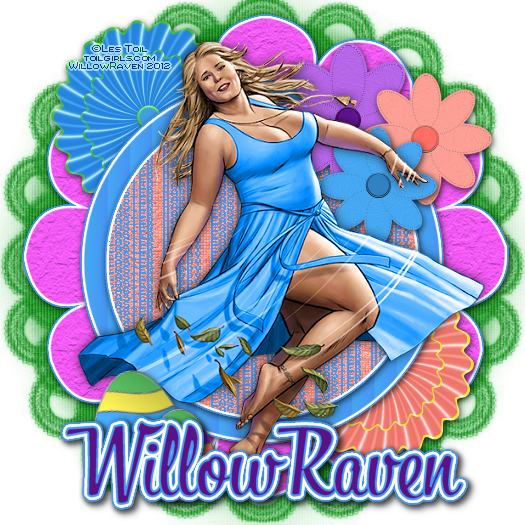
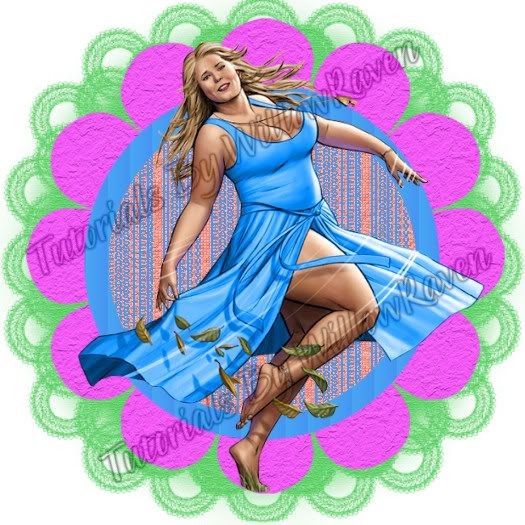
You should now have something like this:
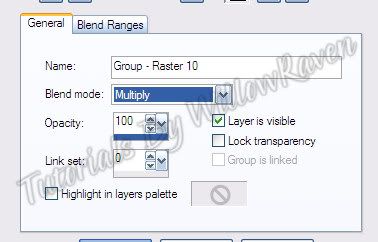
11. Duplicate the mask layer and move it under the mask layer. Go to Adjust-Blur-Gaussian Blur and apply these settings: Radius: 2.00. Go to original mask layer and go to Effects - Texture Effects - Blinds and apply these settings:
Width: 3
Opacity: 30
Color: black
Horizontal: unchecked
Light from left/top: checked
While you are on this layer, go to your layer palette, right click on the layer and go to Properties and when the window opens, apply these settings:
12. At this point, add elements as desired. I used flowers and eggs to give it an Easter feel. The flowers were resized at different sizes between 15-20%, the eggs were done at 10-15%. The swirly flowers (elements 5 and 6) were resized at 25% and then moved just above the flower petal layer. I rotated the slightly larger egg to the left by 5.00. Remember to sharpen anything that you resize and/or rotate.
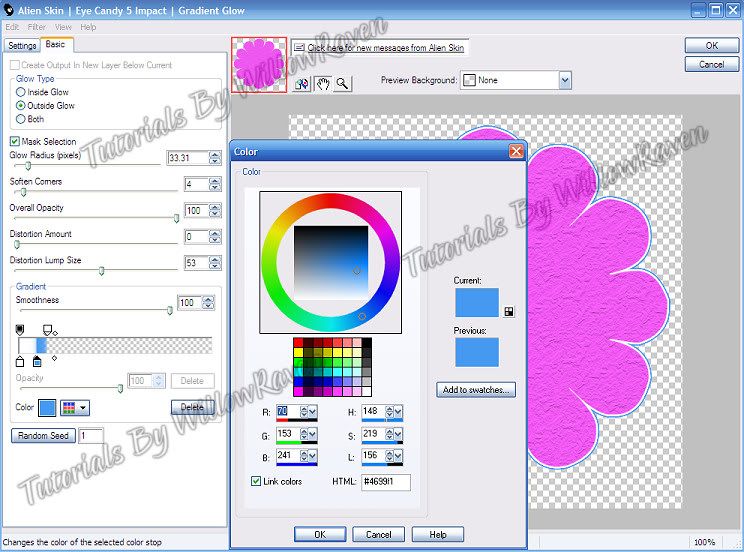
13. When satisfied, make sure all layers are sharpened (if necessary). Then on the 3 paper layers, apply Eye Candy 5 Impact Gradient Glow with the following settings (feel free to use a different color than the blue):
14. Apply desired drop shadow to all layers. I used the following for all layers except the tube layer:
Vertical: 2
Horizontal: 1
Opacity: 75
Blur: 10.00
Color: black
shadow on new layer: unchecked
and used the following for the tube layer:
Vertical: 0
Horizontal: 0
Opacity: 65
Blur: 15.00
Color: black
shadow on new layer: unchecked
I did not do a drop shadow on the text layer or the mask layers.
15. Add copyright information, scrap designer information, tagger watermark.
20. Merge - Merge All Visible. Save as .jpg or .png (jpg will have a white background, .png will have a transparent background). I saved mine as a png to help retain background transparency.
For name/text
1. Using Bistro Script, size 72, stroke width 2.0 ...foreground #4699f1, background #47295f, write your name and place it where you would like it. I am placed mine in the center.
When satisfied, convert to raster. Use Eye Candy 5 Impact Gradient Glow with the previous settings. I moved around the blue and white around a little to something I liked. Then apply a drop shadow with the following settings:
Vertical: 2
Horizontal: 2
Opacity: 75
Blur: 6.00
Color: black
shadow on new layer: unchecked
Repeat drop shadow.
And you are done!!
I would love to see your results!!!
Posted by WillowRaven at 8:05 PM
Labels: FTU artist , FTU Scrap Kit , My Kit , tag made , tutorial
Subscribe to:
Post Comments
(
Atom
)






0 comments :
Post a Comment