Wednesday, June 27, 2012
AKY Take Me Out to the Ballgame Tutorial
Take Me Out to the Ballgame Tutorial
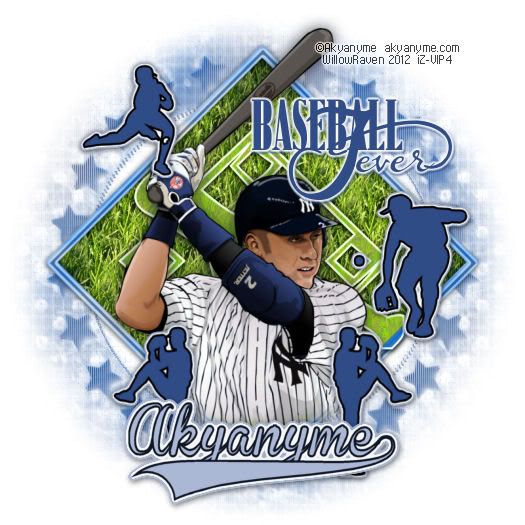
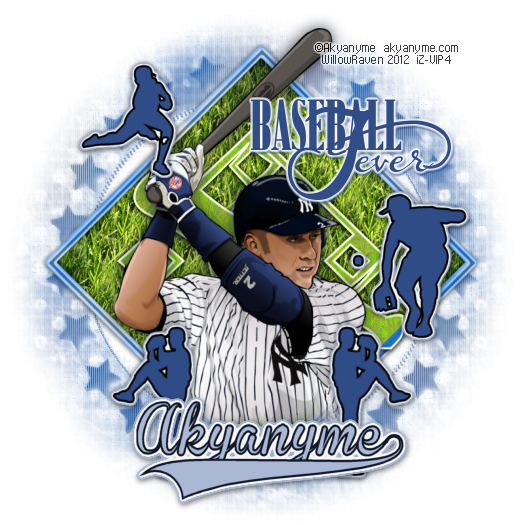
This is what we will be making
Moderate level - Some knowledge of PSP is needed.
Materials Needed:
Paint Shop Pro (used Version 9, but can be done on any version)
Tube "Derek Jeter" by Akyanyme, which is an FTU licensed image at Indie-Zine, found here. Even though it is free, you must still have a license to use work from this artist. License is also free by contacting customer service
Mask from Butterfly Flutterby #73
Baseball Fever" Word-Art (Freebie!) from Bekah & Designs, found here at bottom of post
Dingbat baseball elements and grass pattern in zipfile, HERE
Filters Needed:
Blinds (comes with PSP)
Mosaic - Antique (comes with PSP)
Drop Shadow (comes with PSP)
Xenofex 2 - Little Fluffy Clouds
Eye Candy 5 Impact - Gradient Glow
Fonts used:
FFF Executive for copyright info
Baseball and KR All Sports for the dingbat images
Brannboll Fet for the name/text
Please note: I tend to make the whole tag first, and then apply drop shadows to the items I wish to drop shadow. If you wish to apply them as you go along, that is fine, too! My drop shadow settings are towards the bottom of the tutorial if you would like to use what I have used.
Directions
1. From my zipfile, put the "Grass" jpg in your patterns folder. Open PSP. Open New File, 800 pixels x 800 pixels, 72 pixels/inch resolution, transparent. (Don't worry, we will be resizing it later on.) Open your mask, and minimize in PSP. Also open up word art and minimize that in PSP.
2. In your materials palette, make black your foreground and medium gray your background, then activate your preset tool and click on square with the following settings:
While still in vector format, go to Objects - Align - Center in Canvas. Then go to Image - Rotate - Free Rotate 45 degrees, left .. all layers UNCHECKED. Convert layer to raster. Name this layer "template".
3. With your magic wand, click on the medium gray center. Selections - Modify - Expand: 2.00. Layers - New Raster Layer. Go to your materials palette and in one of them (doesn't matter which), choose the grass pattern with the following settings:
Angle: 0
Scale: 50
Texture: unchecked
flood fill the area with the grass pattern. Select - Select none. Rename this layer "grass".
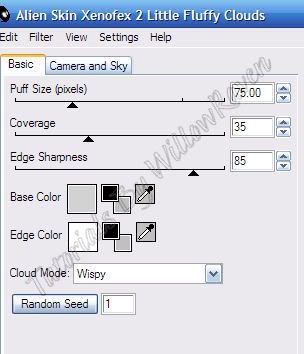
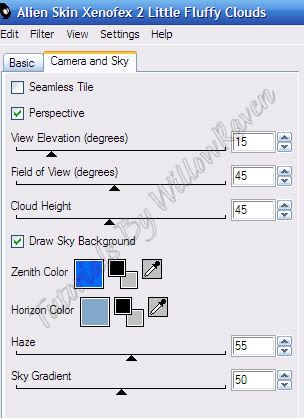
4. Go back to your original square, click on the black outline with your magic wand. Layers, new Raster Layer twice. On one of the new layers go to Selection - Modify - Expand, by 2.00 pixels, and then go to Xenofex 2 - Little Fluffy Clouds and apply the following settings:
Select - Select none. Rename this layer "clouds". On the second new layer, go to Selection - Modify - Contract: 3.00 pixels. Flood fill with darker blue color (I used #220eb8). Selections - Select None. Move this layer above the "clouds" layer and rename the dark blue layer "border".
5. In your materials palette, make your background color #2138c5 and your foreground color white (If you are using the element I gave you - AKY_KR-BaseballDiamond.psd - go to the * areas in parenthesis and disregard how to create it). Using the "KR All Sport" font (* or using the baseball diamond element I enclosed in the zipfile) - create as vector (using the capital "B"") with the following settings:
Objects - Align - Center in Canvas. (* if you are using the element I gave you, just center it as best as you can over the grass area.) Convert to Raster (if creating your own). In your layer palette, change properties to:
Blend Mode: Luminance (Luminance Legacy also works well)
Opacity: 100
Layer is visible: checked
Rename the element layer "diamond" and move it to just above the "grass" layer if its not already. Change the properties of the "grass" layer as follows:
Blend Mode: Multiply
Opacity: 100
Layer is visible: unchecked
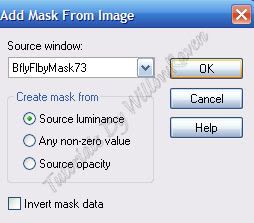
6. Go to Layers - New Raster Layer, then move to the bottom. Go to Xenofex 2 - Little Fluffy Clouds and apply previous settings. Adjust - Blur - Gaussian Blur: 10.00. Go to Layers - New Mask Layer - From Image and apply these settings:
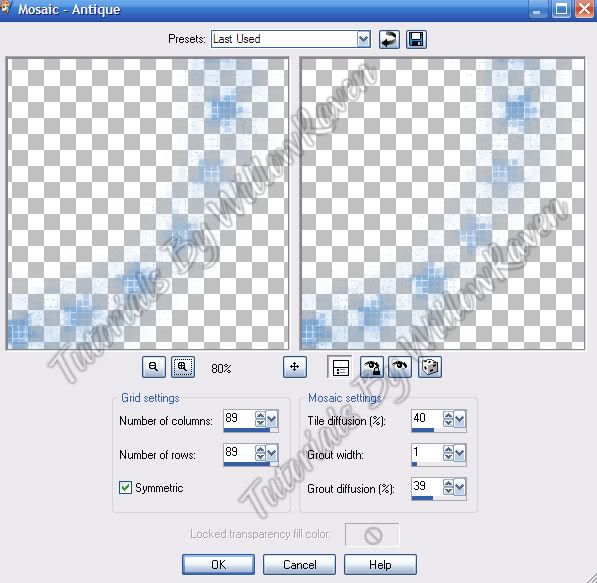
Merge - Merge Group. Duplicate. On bottom one - Adjust - Blur - Gaussian Blur: 3.00. Rename layer "Mask 2". Then go to Mosaic - Antique (comes with PSP) and apply the following settings:
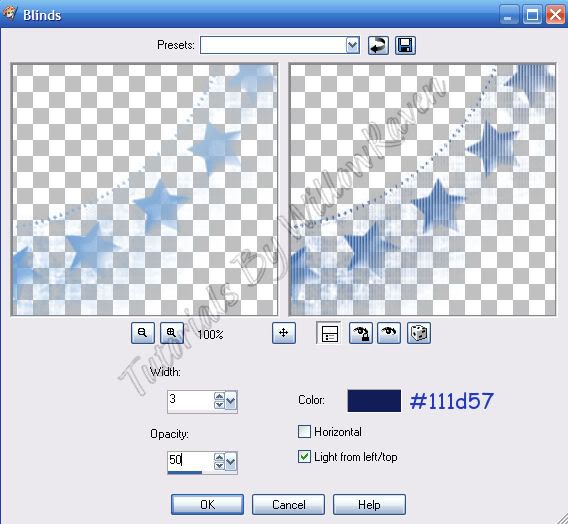
Lower the opacity to about 70. On top mask clouds layer, use the Blinds effect (that comes with PSP) with the following settings:
Adjust - Sharpness - Sharpen. Rename layer "Mask 1".
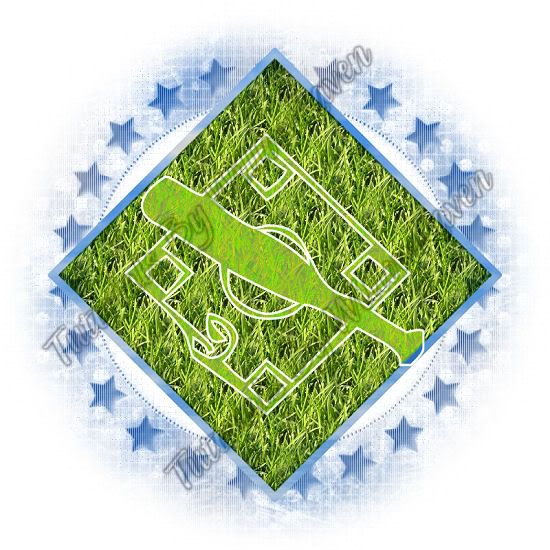
At this point you will probably have an empty raster...go ahead and drop that down to the very bottom and - if desired - flood fill it with white. You should now have something like this:
You can also close out your black/gray square "template".
6. Open your tube and copy it to your tag layers. Name this layer "tube". Resize it 90%, then center it. Activate your eraser tool with the following settings:
Shape: round
Size: 50
Hardness: 10
Step: 25
Density: 100
Thickness: 100
Rotation: 0
Opacity: 25
along the bottom of the tube soften the edges and the bottom 'line' so that it looks more blended with the rest of the tag:
7. In your materials palette, choose black for foreground and #304c86 for background. (If you are using the elements I provided in the zipfile, you can pass #7 - just copy and paste the silhouettes on to tag as desired.) Use the following settings as well:
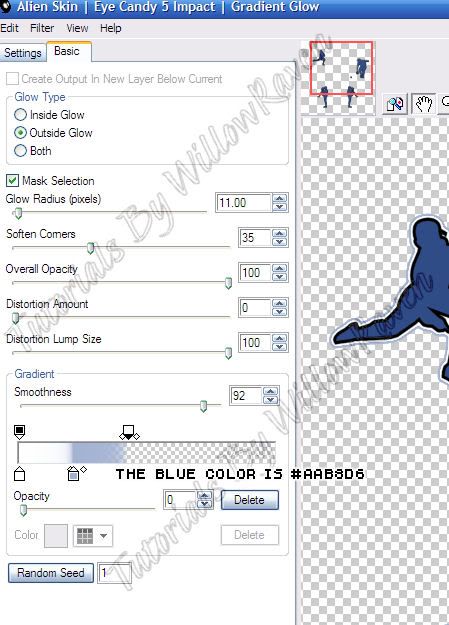
Use the Baseball font (has the silhouettes of baseball players) and choose 2 or 3 positions and place around the tag as desired. Convert to raster when you are happy with look and placement. Merge down all of them to 1 layer. Then go to Eye Candy 5 Impact Gradient Glow and apply these settings:
At this point, resize your total tag to 525 x 525 pixels, 72.000 ppi ... all layers CHECKED. Be sure to sharpen each layer as needed.
8. Maximize your word art. Shift + D to make a copy, close original. Resize it to 200 pixels x 101 pixels, and be sure to change the ppi to 72.000 - Resample using: Weighted Average and all layers checked. Go to Adjust - Color Balance - Manual Color Balance and use the following settings:
Source color: black
Target color: #304c86
(don't have to worry about other settings) .... click "OK". Copy and paste as new layer to your tag. Move to upper right (see my tag for idea) ... then apply Eye Candy 5 Impact Gradient Glow using the previous settings. Also apply the gradient glow to the blue line border layer and set the property for that layer to Luminance (Legacy), Opacity: 50 .
9. At this point, you are pretty much done with the tag itself. Feel free to apply desired drop shadows to layers - I used the following:
for all layers except tube layer, word art layer and mask 1 layer (no drop shadow at all on mask 2 layer):
Vertical: 1
Horizontal: 0
Opacity: 75
Blur: 7.00
Color: black
Shadow on new layer: unchecked
for tube layer:
Vertical: 0
Horizontal: 0
Opacity: 75
Blur: 22.00
Color: #0f1625 (very dark blue)
Shadow on new layer: unchecked
for word art layer and mask 1 layer:
Vertical: 2
Horizontal: 1
Opacity: 70
Blur: 2.00
Color: #304c86 (medium to dark blue)
Shadow on new layer: unchecked
10. Add your copyright information to your tag.
11. For text on tag, I used Brannboll Fet at size 36, 2.0 stroke, color #0f1625 for foreground and #aab8d6 for background. (To get the little 'swish' under the name, type in one of the numbers above the alpha pad - each number makes a different 'swish'...don't put a space between the last letter and the 'swish' number.) Placed it as desired, then did Object - Align - Horizontal Center in Canvas. Convert to Raster. Then I used Eye Candy 5 Impact - Gradient Glow with the previous settings, then applied the following drop shadow settings:
Vertical: 2
Horizontal: 1
Opacity: 50
Blur: 8.00
Color: black
Shadow on new layer: unchecked
Go to Edit - Copy Merged and then save that as jpg. *or* close out white background and save as a .png with a transparent background.
And here it is with transparent background (jpg background at top of tutorial):
And that is it!!
I hope you enjoyed the tutorial and would love to see your results!
Posted by WillowRaven at 6:08 PM 0 comments
Labels: FTU Licensed Artist , indie-Zine , iZ , No Scraps , Non-Animated , tutorial
Subscribe to:
Comments
(
Atom
)

